Getting Started - Important
The first step is to get access to your school’s page.
ALL SCHOOL FACEBOOK PAGES HAVE BEEN REGISTERED. Please do not attempt to create a new one.
The district will give you permission to administer your school’s page.
The first step is to get access to your school’s page.
ALL SCHOOL FACEBOOK PAGES HAVE BEEN REGISTERED. Please do not attempt to create a new one.
The district will give you permission to administer your school’s page.
The first step is to get access to your school’s page.
ALL SCHOOL FACEBOOK PAGES HAVE BEEN REGISTERED. Please do not attempt to create a new one.
The district will give you permission to administer your school’s page.
https://developers.facebook.com/docs/plugins/page-plugin/
https://developers.facebook.com/docs/development/create-an-app
1590918427791514
In the “Getting Started” section, we talked briefly about searching for your school and finding that a page or pages had already been created. Here, we will talk about what to do! In our example, Treasure Coast High School had three “hits” that came up in the search. We will go through each one and discuss the differences, and suggest what to do in each case.
The first is the one below. This is a “Community page” and you can’t claim it or dispute it, because community pages are by nature, not official pages for an entity. They are like “fan” pages, created for a community of people that are involved with that entity. This one we can ignore. If you have one that has objectionable content on it or (as in the case below) really out of date information (or next to nothing on it), you can try to contact the page owner and have them remove it, but they are not obligated to. If the content is objectionable to the point that it violates Facebook policies, you can report the page to Facebook for removal (see “Reporting a Page” in the menu). In our case below, we will just ignore this page.
The page below is auto generated by Facebook. The way that this is determined is the circled notice. These pages get created by Facebook several ways, and they can be merged into your official page once it’s created. To merge it, just click “Edit” and then “Add an official page”. Your official page needs to exist before you can do this.


Now on to our final page, and this one we can claim (finally!). Not only can we claim it, but we SHOULD claim it, because it exists in the official Facebook “space” for our school. The way to tell is that it has the full name of the school, and the category is “Public School”. There cannot exist more than one in this category for the same school, so it’s important to have ownership of this main one. If someone has already claimed it and is operating it, please contact ITS (contact webmaster@stlucieschools.org) to discuss the options available, because at that point the best course of action really depends on a lot of factors. Nobody is in trouble if they’ve done this! In fact, we’ve had several individuals who have.
We definitely want to claim this page, and it looks like nobody is actually managing it! We can tell because there are only reviews and “posts about…” and no posts actually made by the page (see below). The first step is to make sure there is a website listed for the school. If there is not, you can add one. Just click the “Suggest Edits” button, and add it, and be sure to save it afterward. Scroll down to find out how to claim this page.
Claim the page by clicking the ellipsis in the menu, and then clicking “This is my business”. You will then get a screen asking if you want to merge the page into an existing page that you already have or claim it as your page. THIS IS VERY IMPORTANT: IF YOU HAVE ALREADY CREATED A PAGE PRIOR TO CLAIMING ANOTHER PAGE, PLEASE CONTACT ITS (contact webmaster@stlucieschools.org). You’re not going to be in trouble. You didn’t do anything bad. But there is a lot to consider when merging pages, and it’s best to discuss these options by comparing the two proposed pages. Merging combines likes and followers but NOT ratings or content. It also affects the URL (you have to pick one!), and your page URL (the name) can only be changed ONCE, EVER. So it’s very important to not take these decisions lightly otherwise you could lose an existing following or existing content.
If this does not apply to you, please click the “Claim…..” link and proceed.

The next screen will ask you to validate your ownership claim. This can be done several ways. If you have access to the phone number that comes up, then you can use that option. If you click to continue, Facebook will IMMEDIATELY call that phone number and give you a code, so be sure you are at the phone before clicking the button. You may add an extension if you need to. Once you put in this code and click the final button, you’re done! There may be a waiting period while Facebook approves the request, but you will be notified by email when that approval is complete.
If you do not have access to the phone/extension or it is not the correct number for your school, you will need to use an alternate method for verification. Please contact ITS (contact webmaster@stlucieschools.org) in this case, because unless you’ve used your username@stlucie.k12.fl.us email to setup Facebook, you will not be able to validate using this method.
You may ask, why do we want this page so badly…..224 likes and 4 and 5 star ratings…that’s why! We want those..and we’d lose them if we created a completely new page.
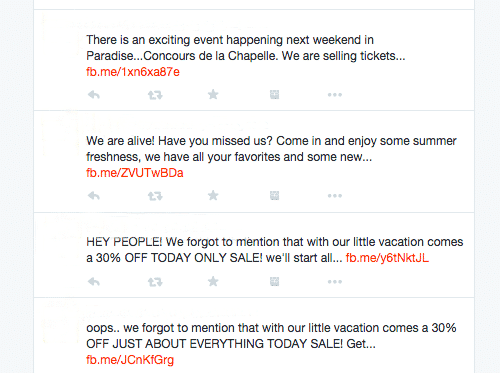
Turn off automatic Twitter posting by unlinking the two accounts. You can also remove all Twitter posts from your Facebook page.
1. Navigate your Web browser to Facebook. Expand the menu in the top right corner of the Facebook page and select “Account Settings.”
2. Click “Apps” in the left pane to view the list of apps that have access to your account.
3. Click the “Edit” link at the right of the “Twitter” app.
4. Click the “Remove app” link in the top right corner of the app information section.
5. Place a check mark in front of the “Delete all app activity” if you want to take all auto Twitter posts off Facebook.
6. Click the “Remove” button to unlink the two accounts and remove the Twitter posts.
Why it’s a bad idea to connect your Twitter to your Facebook account:
Twitter has made it deceptively easy to connect your Twitter account to your Facebook account, but don’t be fooled. It’s usually not a good idea. Twitter and Facebook are two very different networks. The people you’re connected to on Twitter expect different things than those you’re connected to on Facebook (even if most of them are the same group of people).
Twitter is a high-volume network, where you can tweet ten or twenty times a day. Because you are encouraged to follow lots of different people – those you know and those you don’t – and because you don’t require their permission to do so, Twitter is a more informal and loosely connected network.
Facebook, on the other hand, is much more personal. The volume of updates on Facebook is much, much less than on Twitter! People expect one, maybe two status updates a day, maximum.
The culture of both networks is different, so if you combine them you risk alienating your audience. By posting your tweets to your Facebook profile, you’ll inundate your Facebook friends with status update after status update, taking over their newsfeed and appearing spammy. Those 10 tweets will fit perfectly within Twitter’s real-time home timeline, but they’ll clutter up your Facebook wall and may even result in a block or an unfriending.
Rather than using Facebook it is HIGHLY recommended to use your website and push messages to your social accounts from there. These link back to your website, and drive traffic to it. The social sites affect the visibility of the website, and the website affects the visibility of the social accounts. These work together HARMONIOUSLY….they are not competition to see which has more visitors, or more likes, or more follows. There is traffic that will ONLY come to your website, they are not interested in your social accounts; and there is traffic that will only come via Twitter, or Facebook. But in any case, the bulk of the information about your school will be on your website. The final authority of what is accurate and current is what is on your website. For this reason, it is imperative to have your website and social accounts working together to bump up the visibility of your school as a whole. Then by pushing out information from this central location, you are sure to capture everyone, using the method they are most comfortable with.
In addition, if you’re posting from Facebook to Twitter (or Twitter to Facebook) this requires your Twitter followers to visit Facebook to read your posts! Or your Facebook followers to sign up for twitter to view your tweets! Remember, you can’t view much of Twitter without an account. Not a desirable requirement at all. Your information should be accessible and easy to find. The best way is to post to your website and auto share from there. We have an integrated plugin that makes this very easy–it will automatically post your news to any of your social networks when you post to your site–and can be turned off or on for each individual post. No more auto posting everything….you have complete control.
This is what you want your Feed to look like:
Not like this:
Social media platforms are constantly evolving their algorithms and interfaces. Content creators and marketers need to be proactive and stay updated with the latest information.
Though a small element of the entire user experience, image sizes matter a lot on social media. The wrong image dimensions can result in ill-fitting or cropped content. Worse still, the target platform might reject your carefully-edited images if they’re not optimized for size.
Finish “About” Section
The “about” section will serve as the main 2-3 sentence description for your school. It will be on your main page, so make it descriptive but succinct. Be sure to include a link to your website as well.
This is also where you can select your unique domain (that, as mentioned above, can only be changed once).
Next you’ll be asked to upload a picture. This will serve as the main visual icon of your page, appearing in search results and alongside any comments you publish. While any perfectly square image will work, the recommended size is 180 x 180 pixels.
Every individual Facebook user has a vertical navigation bar to the left of their News Feed. You can add your Business Page as a “Favorite” item here — similar to bookmarking a web page in your web browser — for easy access.
The basic skeleton of your Business Page is now live. Facebook will ask if you’d like to “Like” your Page. Again, I recommend avoid doing so at the moment. This activity will appear in News Feeds of those you’re connected to personally to on Facebook. Without any content on the Page, we want to save that organic Timeline story for when you’re really ready for people to view the Page.
In the top navigation, you’ll see an option for “Settings.” Click that. Along the left side, a vertical navigation bar with different sections should appear. We’ll focus on three core ones now:
Now it’s time to actually publish content to your page.
The rest of your Page will populate over time as you publish more updates.
When posting on your page, just be sure to use a variety of content. You can also click the little grey arrow in the top-right corner of each post and then click “Pin to Top” to move one of your posts to the top of your Page’s Timeline for seven days.
This is the large, horizontal image that spans the top of your Facebook Page. Typically, this is a branded image to help attract people to your Page. The official photo dimensions are 851 x 315 pixels.
Now that there’s content on the page, you can start strategically inviting users to “like” it.
With content published and users invited, you can go to the “Activity” tab in your Page’s top navigation to monitor how people are engaging with your Page and content.
Finally, we need to measure our efforts to ensure we’re making valuable marketing decisions on Facebook. Fortunately, Facebook has embedded in some decently helpful metrics for us to take advantage of. Simply click the “Insights” option in the top navigation to see the following:
Need to pass on your page to someone else? Need to add someone else to help with Facebook?
It’s very easy to give someone permission to edit your Facebook page, or transfer to someone else if you’re leaving.
Simply go to “Settings” and “Page Roles” (on the left) when you are on the page (this is easier to do from a computer, not a phone, the menus are in a different spot and harder to find).


What will come up next is a page that looks like this:

In this area, paste the person’s Facebook account name and when they show up in the dropdown, click it.
THIS IS VERY IMPORTANT, YOU MUST CLICK THE NAME IN THE DROPDOWN.
The account name is the name after the facebook URL in someone’s profile. For instance, mine is at https://www.facebook.com/samanthadotnet (samanthadotnet)
Next, select the role level from the list of choices. If you are adding a user who will help you, then select Editor. If you are adding me, please give me “Admin”. You will have to enter your Facebook password again to complete the action.
Now the other person can remove you (if they are taking over the page).
If you are still having problems, please contact me at samantha.davis@stlucieschools.org
If you created a Facebook account solely for the purpose of managing your school’s page, you probably aren’t interested in using Facebook on a personal level. If this is the case, below are steps to lock your account completely. You will still been “seen” on Facebook but nobody can see any of your activity and nobody can send you friend requests. If you don’t do this, as soon as you create an account, Facebook will start suggesting you to people that it thinks might know you.
http://www.wikihow.com/Stop-All-Friend-Requests-on-Facebook
Another resource with more privacy settings:
If you created an account and named it the name of the school or something that is not “you”…you will run the risk of Facebook deleting your account. It is against their policies to be anything other than “yourself”. Your account will be deleted without any warning at all, and if you are the sole administrator of a page, the page will be deleted as well…without any warning, recourse, or chance to retrieve it.
Please note as well that Facebook does periodically change their privacy settings and in the past this has caused privacy settings to change. In order to maintain your privacy settings level, be sure to note any privacy update notifications that Facebook sends and manage your account accordingly.
Setting a custom page name and URL is extremely important on Facebook, and makes your page look much more professional. Your page name and url are shown below….this is what they should look like (much cleaner!) and the second image shows what they look like by default (not what you want!):

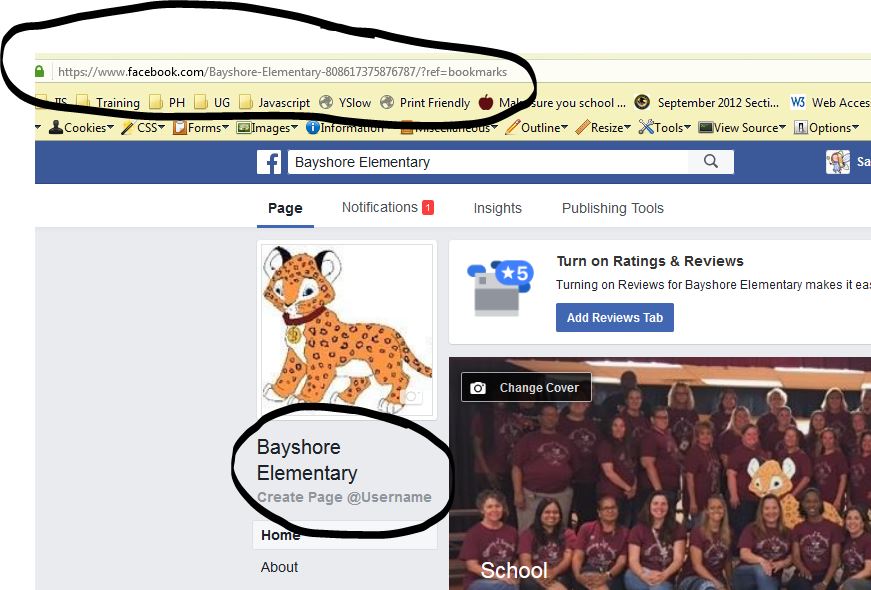
Setting this up is very easy! Simply click area circled in the picture above (“Create Page @Username”) and put in the name of your school (see the screenshot below). No spaces or special characters are allowed. PLEASE USE THE FULL NAME OF YOUR SCHOOL. In this circumstance, it does not matter how long it is, and using your full name is preferable, since this is how people will search for you on Facebook.
Please do not try to be clever here. Using a mysterious name to “hide” your page from everyone but the people you want is not a strategy. And you are only allowed to change your page ID ONCE. That’s it. PLEASE DO NOT TRY TO BE CLEVER HERE. Do not use the mascot name, abbreviations, or any other clever trickery. You need to spell out the name of the school or nobody will find your page.
Please do not shorten your name, abbreviate your name, or include St. Lucie in your name (unless your name has St. Lucie in it :P). If you have trouble using your name and Facebook says you can’t use that name, try with or without the “School”, IE: If BayshoreElementary does not work, try BayshoreElementarySchool. Or the reverse. The ONLY acceptable revision should be with our without “School”. If you continue to have issues trying to pick a name that Facebook allows, PLEASE CONTACT ME and I will assist you with choosing a name.

Settings > Messaging
One of the down sides of social media is its 24/7 nature – when you shut down your computer and head home at 5pm, your Facebook page is still working. Traffic to Facebook actually spikes in the evening on many pages as users are browsing their newsfeed on a smartphone or tablet while relaxing at home in the evening…
I woke up this morning to a notification on my phone received at 00:39 – someone had sent a Facebook message to one of the pages I manage overnight. Unsurprisingly I was asleep at the time so didn’t see it until I checked my phone in the morning, but Facebook has registered this as ignored for seven hours which isn’t good customer service.
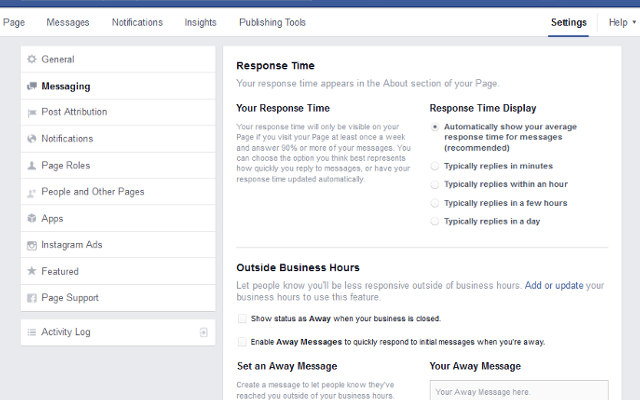
One way to manage this is to set-up instant replies on your Facebook page – click the ‘Settings’ heading at the top right corner of your page, write your Out of Office reply within the ‘Messaging‘ section and it’s sent to anyone who messages your page out of hours.
Settings > Page Roles
If you have Admin rights to a Facebook business page, you can add new users who can add content to the page and help you manage it. There are five different types of roles for people who manage pages:
To add a new user to your Facebook page, click the ‘Settings’ heading in the top right hand corner and then choose ‘Page Roles’ from the menu on the left.

To add someone, type the email address they use to log into Facebook, choose their access level then hit Enter. They will receive a notification from Facebook that someone has given them admin rights to a Facebook business page.
Quick note: Be careful who you add as an Admin – they can remove other page Admins and even delete the page – and also make sure that anyone added as an Editor knows the guidelines on what to post
Settings > Post Attribution
When you publish a post on your Facebook page, you want it to come from your business, not from your personal account.
Hitting publish to then see your personal profile picture (the one of you and the kids on the beach last Summer) might not quite be the professional look you were going for….
*Cringe*
To make sure all posts appear correctly, check the Post Attribution settings and tick the button that tells Facebook that every time you’re on your business page and you post something, it defaults as being by the business page.

About > General > Username
Take a quick look at your Facebook business page now – what does the URL in the browser bar look like?
If it’s something like this:
https://www.facebook.com/my-lovely-page-162166373456878/
(see all the numbers at the end?) then you’re missing an opportunity. In less than a minute you can easily change the web address of your Facebook page to something a bit more memorable, like www.facebook.com/my-lovely-page
Click the ‘About’ tab below your Facebook cover photo, then click the Facebook Web Address option and type whatever you’d like to appear after the Facebook.com URL.

If it’s available, Facebook will ask you to confirm the change, then immediately you’ll have your own lovely personalized URL.
Insights > Posts
One question I get asked all the time is “When is the best time to post to Facebook?” And my answer, every time, is “it depends”.
I know that’s a frustrating answer, but your audience might be different to mine so I can’t tell you when they’re most likely to see your post.
The only way to find that answer is to look at your Facebook insights data.

This information is easy to access via the ‘Insights’ tab at the top of your Facebook page; click the ‘Posts’ heading in the left menu.
Scroll down on this page and you can also see which of your posts have the greatest reach.

The simple takeaway from this chart is: do more of what’s working. Identify the posts which reach most people and publish more like them.
Dropdown below Cover Photo >Edit
The Norfolk Coast Holiday Cottages page prompts visitors to ‘Book Now’ via the button on their Facebook cover photo:
There are currently 12 options for your Facebook cover photo button, each with different ways to customise what happens:
To edit yours, click the button, select from the dropdown menu and follow the steps.
Settings > General > Visitor Posts
Social media, by its very nature, is social, which means it’s two-way communication, so you will most likely receive comments and posts from other people on your page.
This interaction indicates to Facebook that your page is interactive and therefore engaging, which helps you reach more people.
Check your settings to ensure you have enabled other people to post on your page. PLEASE TURN OFF PHOTO AND VIDEO POSTS (Unlike the picture below):

Click 3 dots on post then ‘Pin to Top’
Social media is fast-moving – as soon as you’ve published something it gradually gets pushed down the newsfeed as new more topical posts get published.
One way to get your message seen long after it’s published is to pin it to the top of your newsfeeds – this means that even when you publish other content, this post will stay at the top of your feed until you remove it.
Examples of posts you might want to pin to the top of your feed:
Click Cover Photo > Add Description
Did you know you could add a link to your About page to your cover photo?
This means that if anyone’s interested in finding out more about you, they can click easily through to your website from your Facebook page. You can even link to a special offer or a sign-up form to join your email list from your cover photo or profile pic.
To add the link, simply click on your Facebook cover photo (the big pic at the top of your feed) or your Facebook profile pic, then click ‘Add a description’ to the right of the photo. Here you can type in more information about your business, and paste in a link to a relevant page of your website.
Settings > Featured
The featured pages section is a great way to show off some other Facebook pages that serve the same audience as you and that you would like to support.
By showcasing a few related pages on your Facebook business page (on the left-hand side of your page, as shown below), you’re adding value to your audience and showing them some additional places where they can find content that they might find interesting.

To add featured pages, visit your ‘Settings’ again and select ‘Featured’ from the menu on the left.

You can choose a few to feature from all those that you’ve already ‘liked’ in the past by clicking ‘Edit Featured Likes’.
Keep up with all the changes to Facebook can be a challenge, but you know I love to keep you up-to-date with any changes that could affect your business so hopefully this post has been useful.
I’ve also created a super helpful checklist that you can download for free on the link below – once you’ve downloaded it, simply print it out and complete it as you work through your Facebook page settings.
https://developers.facebook.com/docs/plugins/page-plugin/
https://developers.facebook.com/docs/development/create-an-app
1590918427791514
In the “Getting Started” section, we talked briefly about searching for your school and finding that a page or pages had already been created. Here, we will talk about what to do! In our example, Treasure Coast High School had three “hits” that came up in the search. We will go through each one and discuss the differences, and suggest what to do in each case.
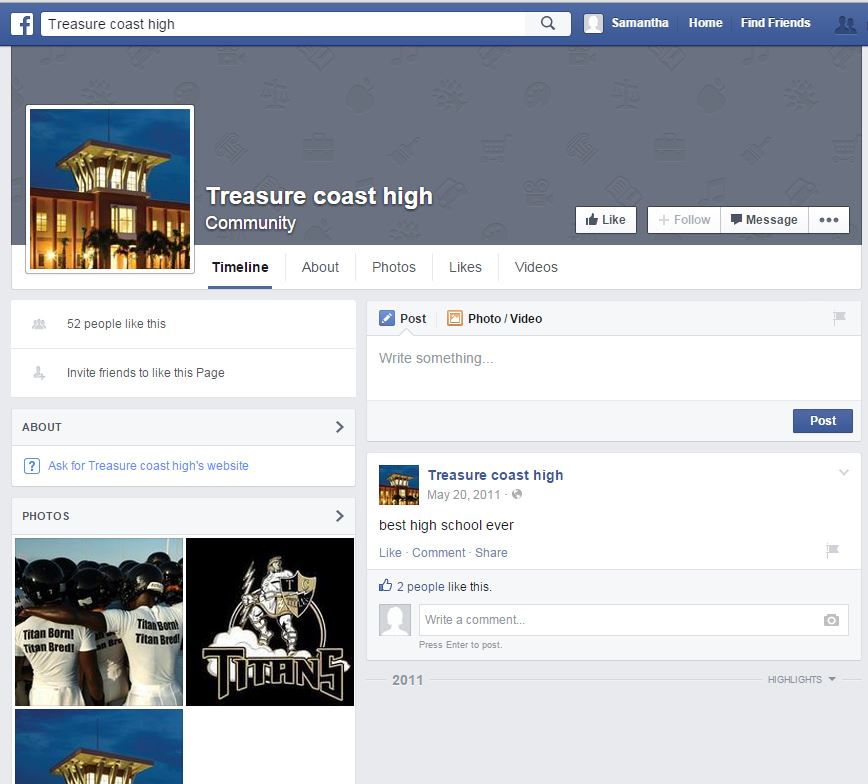
The first is the one below. This is a “Community page” and you can’t claim it or dispute it, because community pages are by nature, not official pages for an entity. They are like “fan” pages, created for a community of people that are involved with that entity. This one we can ignore. If you have one that has objectionable content on it or (as in the case below) really out of date information (or next to nothing on it), you can try to contact the page owner and have them remove it, but they are not obligated to. If the content is objectionable to the point that it violates Facebook policies, you can report the page to Facebook for removal (see “Reporting a Page” in the menu). In our case below, we will just ignore this page.
The page below is auto generated by Facebook. The way that this is determined is the circled notice. These pages get created by Facebook several ways, and they can be merged into your official page once it’s created. To merge it, just click “Edit” and then “Add an official page”. Your official page needs to exist before you can do this.
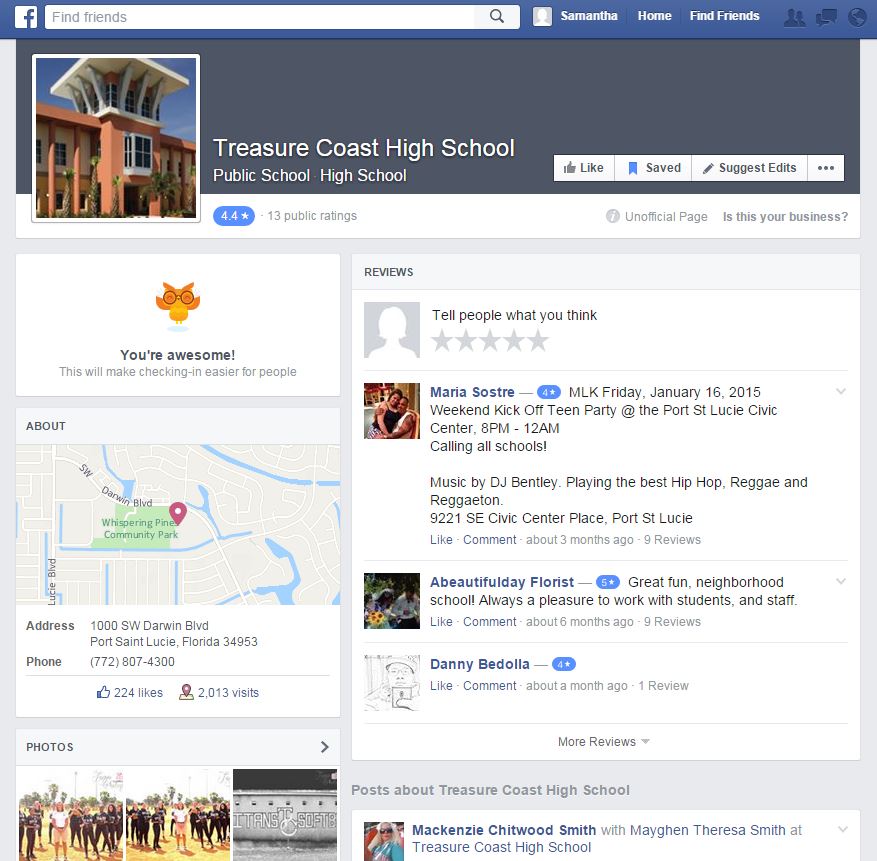
Now on to our final page, and this one we can claim (finally!). Not only can we claim it, but we SHOULD claim it, because it exists in the official Facebook “space” for our school. The way to tell is that it has the full name of the school, and the category is “Public School”. There cannot exist more than one in this category for the same school, so it’s important to have ownership of this main one. If someone has already claimed it and is operating it, please contact ITS (contact webmaster@stlucieschools.org) to discuss the options available, because at that point the best course of action really depends on a lot of factors. Nobody is in trouble if they’ve done this! In fact, we’ve had several individuals who have.
We definitely want to claim this page, and it looks like nobody is actually managing it! We can tell because there are only reviews and “posts about…” and no posts actually made by the page (see below). The first step is to make sure there is a website listed for the school. If there is not, you can add one. Just click the “Suggest Edits” button, and add it, and be sure to save it afterward. Scroll down to find out how to claim this page.
Claim the page by clicking the ellipsis in the menu, and then clicking “This is my business”. You will then get a screen asking if you want to merge the page into an existing page that you already have or claim it as your page. THIS IS VERY IMPORTANT: IF YOU HAVE ALREADY CREATED A PAGE PRIOR TO CLAIMING ANOTHER PAGE, PLEASE CONTACT ITS (contact webmaster@stlucieschools.org). You’re not going to be in trouble. You didn’t do anything bad. But there is a lot to consider when merging pages, and it’s best to discuss these options by comparing the two proposed pages. Merging combines likes and followers but NOT ratings or content. It also affects the URL (you have to pick one!), and your page URL (the name) can only be changed ONCE, EVER. So it’s very important to not take these decisions lightly otherwise you could lose an existing following or existing content.
If this does not apply to you, please click the “Claim…..” link and proceed.
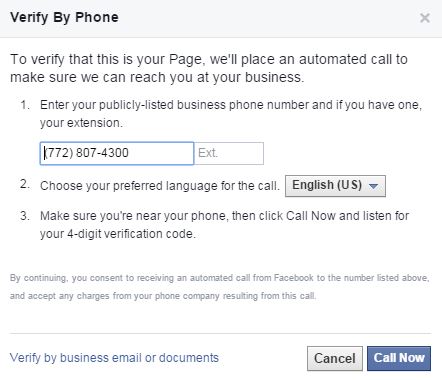
The next screen will ask you to validate your ownership claim. This can be done several ways. If you have access to the phone number that comes up, then you can use that option. If you click to continue, Facebook will IMMEDIATELY call that phone number and give you a code, so be sure you are at the phone before clicking the button. You may add an extension if you need to. Once you put in this code and click the final button, you’re done! There may be a waiting period while Facebook approves the request, but you will be notified by email when that approval is complete.
If you do not have access to the phone/extension or it is not the correct number for your school, you will need to use an alternate method for verification. Please contact ITS (contact webmaster@stlucieschools.org) in this case, because unless you’ve used your username@stlucie.k12.fl.us email to setup Facebook, you will not be able to validate using this method.
You may ask, why do we want this page so badly…..224 likes and 4 and 5 star ratings…that’s why! We want those..and we’d lose them if we created a completely new page.
https://accounts.google.com/signup/v2/webcreateaccount?flowName=GlifWebSignIn&flowEntry=SignUp
Please sign up using your district email address, and do not create a gmail account.

Turn off automatic Twitter posting by unlinking the two accounts. You can also remove all Twitter posts from your Facebook page.
1. Navigate your Web browser to Facebook. Expand the menu in the top right corner of the Facebook page and select “Account Settings.”
2. Click “Apps” in the left pane to view the list of apps that have access to your account.
3. Click the “Edit” link at the right of the “Twitter” app.
4. Click the “Remove app” link in the top right corner of the app information section.
5. Place a check mark in front of the “Delete all app activity” if you want to take all auto Twitter posts off Facebook.
6. Click the “Remove” button to unlink the two accounts and remove the Twitter posts.
Why it’s a bad idea to connect your Twitter to your Facebook account:
Twitter has made it deceptively easy to connect your Twitter account to your Facebook account, but don’t be fooled. It’s usually not a good idea. Twitter and Facebook are two very different networks. The people you’re connected to on Twitter expect different things than those you’re connected to on Facebook (even if most of them are the same group of people).
Twitter is a high-volume network, where you can tweet ten or twenty times a day. Because you are encouraged to follow lots of different people – those you know and those you don’t – and because you don’t require their permission to do so, Twitter is a more informal and loosely connected network.
Facebook, on the other hand, is much more personal. The volume of updates on Facebook is much, much less than on Twitter! People expect one, maybe two status updates a day, maximum.
The culture of both networks is different, so if you combine them you risk alienating your audience. By posting your tweets to your Facebook profile, you’ll inundate your Facebook friends with status update after status update, taking over their newsfeed and appearing spammy. Those 10 tweets will fit perfectly within Twitter’s real-time home timeline, but they’ll clutter up your Facebook wall and may even result in a block or an unfriending.
Rather than using Facebook it is HIGHLY recommended to use your website and push messages to your social accounts from there. These link back to your website, and drive traffic to it. The social sites affect the visibility of the website, and the website affects the visibility of the social accounts. These work together HARMONIOUSLY….they are not competition to see which has more visitors, or more likes, or more follows. There is traffic that will ONLY come to your website, they are not interested in your social accounts; and there is traffic that will only come via Twitter, or Facebook. But in any case, the bulk of the information about your school will be on your website. The final authority of what is accurate and current is what is on your website. For this reason, it is imperative to have your website and social accounts working together to bump up the visibility of your school as a whole. Then by pushing out information from this central location, you are sure to capture everyone, using the method they are most comfortable with.
In addition, if you’re posting from Facebook to Twitter (or Twitter to Facebook) this requires your Twitter followers to visit Facebook to read your posts! Or your Facebook followers to sign up for twitter to view your tweets! Remember, you can’t view much of Twitter without an account. Not a desirable requirement at all. Your information should be accessible and easy to find. The best way is to post to your website and auto share from there. We have an integrated plugin that makes this very easy–it will automatically post your news to any of your social networks when you post to your site–and can be turned off or on for each individual post. No more auto posting everything….you have complete control.
This is what you want your Feed to look like:
Not like this:
Your school likely already has a twitter account. Please do not register multiple school twitter accounts. Contact the District to get access to your school Twitter account.
If you would like to have a separate twitter account for yourself:
Go to www.twitter.com to sign up. Enter the appropriate information (full name, email and password) on the right-hand side before clicking “Sign up for Twitter.”
The site will then ask you to verify the information, choose a username and agree to the Twitter Terms of Service before proceeding.
Build Your Timeline: Twitter is based on following and being followed, so the next step is choosing some interesting people to follow. Don’t overwhelm yourself at the start, choose a few of the suggestions based on your interests and then move to the next step.
Add Personal Info: Once you’re setup, Twitter will ask you to upload an image (maximum size of 700k) and provide a brief, 160-character bio about yourself.
Tweet. Just click inside the “Compose new tweet….” box in the upper left-hand corner of the home tab or click the blue feather icon in the upper right-hand corner at any time to get started. Remember, text is strictly limited to 140 characters.
Hashtags
The hashtag symbol (#) is a great way to mark specific topics or keywords in a Tweet. It was created by Twitter users as a way to classify messages and has since become a cultural phenomenon. All you have to do is place a hashtag in front of a word or phrase in your tweet. #Easy!
Mentions & Replies
Two more ways you can connect with other Twitter users. Mentions and replies are updates that contain “@username” anywhere in the body of the tweet. Place a “@” in front of the person, business, organization or whatever you want to mention or reply to. A recent change has made it so that your replies to someone will be seen only by mutual followers if you place their “@username” at the beginning of your tweet. If you want your followers to see your mentions/replies to someone, set the “@username” at the end of the tweet or put a period in front of the ampersand like this: “.@”.
Retweets
A retweet is a way to share another Twitter user’s tweet with all of your followers. It will essentially look the same as normal tweets with the author’s name and username next to it, but it will also contain the retweet icon and the name of the user who reposted it. Click the “Retweet” option under a tweet in order to share.
Favorites
Adding a tweet as a favorite is similar to liking something on Facebook. It’s a way to let the original poster know you liked their tweet for whatever reason. However, it also gives you a way to save a tweet so you can refer back to it later. Simply click the star icon with “Favorite” next to it in order to favorite a tweet.
A great website that explains how Twitter works:
https://www.momthisishowtwitterworks.com/
By cleverly targeting certain hashtags you’ll be more likely to start conversations, increase your engagement and ultimately get more followers.
Remember to have fun with it and keep an eye on your Twitter analytics to see what works best for you.
Social media platforms are constantly evolving their algorithms and interfaces. Content creators and marketers need to be proactive and stay updated with the latest information.
Though a small element of the entire user experience, image sizes matter a lot on social media. The wrong image dimensions can result in ill-fitting or cropped content. Worse still, the target platform might reject your carefully-edited images if they’re not optimized for size.
If you use a Twitter account and a Facebook page, you can connect Twitter to the Facebook page and update both of them with a single post. If you no longer want to post Twitter posts on the page automatically, turn off automatic Twitter posting by unlinking the two accounts. You can also remove all Twitter posts from your Facebook page.
1. Navigate your Web browser to Facebook. Expand the menu in the top right corner of the Facebook page and select “Account Settings.”
2. Click “Apps” in the left pane to view the list of apps that have access to your account.
3. Click the “Edit” link at the right of the “Twitter” app.
4. Click the “Remove app” link in the top right corner of the app information section.
5. Place a check mark in front of the “Delete all app activity” if you want to take all auto Twitter posts off Facebook.
6. Click the “Remove” button to unlink the two accounts and remove the Twitter posts.
Why it’s a bad idea to connect your Twitter to your Facebook account:
Twitter has made it deceptively easy to connect your Twitter account to your Facebook account, but don’t be fooled. It’s usually not a good idea. Twitter and Facebook are two very different networks. The people you’re connected to on Twitter expect different things than those you’re connected to on Facebook (even if most of them are the same group of people).
Twitter is a high-volume network, where you can tweet ten or twenty times a day. Because you are encouraged to follow lots of different people – those you know and those you don’t – and because you don’t require their permission to do so, Twitter is a more informal and loosely connected network.
Facebook, on the other hand, is much more personal. The volume of updates on Facebook is much, much less than on Twitter! People expect one, maybe two status updates a day, maximum.
The culture of both networks is different, so if you combine them you risk alienating your audience. By posting your tweets to your Facebook profile, you’ll inundate your Facebook friends with status update after status update, taking over their newsfeed and appearing spammy. Those 10 tweets will fit perfectly within Twitter’s real-time home timeline, but they’ll clutter up your Facebook wall and may even result in a block or an unfriending.
Rather than using Facebook it is HIGHLY recommended to use your website and push messages to your social accounts from there. These link back to your website, and drive traffic to it. The social sites affect the visibility of the website, and the website affects the visibility of the social accounts. These work together HARMONIOUSLY….they are not competition to see which has more visitors, or more likes, or more follows. There is traffic that will ONLY come to your website, they are not interested in your social accounts; and there is traffic that will only come via Twitter, or Facebook. But in any case, the bulk of the information about your school will be on your website. The final authority of what is accurate and current is what is on your website. For this reason, it is imperative to have your website and social accounts working together to bump up the visibility of your school as a whole. Then by pushing out information from this central location, you are sure to capture everyone, using the method they are most comfortable with.
In addition, if you’re posting from Facebook to Twitter (or Twitter to Facebook) this requires your Twitter followers to visit Facebook to read your posts! Or your Facebook followers to sign up for twitter to view your tweets! Remember, you can’t view much of Twitter without an account. Not a desirable requirement at all. Your information should be accessible and easy to find. The best way is to post to your website and auto share from there. We have an integrated plugin that makes this very easy–it will automatically post your news to any of your social networks when you post to your site–and can be turned off or on for each individual post. No more auto posting everything….you have complete control.
Finish “About” Section
The “about” section will serve as the main 2-3 sentence description for your school. It will be on your main page, so make it descriptive but succinct. Be sure to include a link to your website as well.
This is also where you can select your unique domain (that, as mentioned above, can only be changed once).
Next you’ll be asked to upload a picture. This will serve as the main visual icon of your page, appearing in search results and alongside any comments you publish. While any perfectly square image will work, the recommended size is 180 x 180 pixels.
Every individual Facebook user has a vertical navigation bar to the left of their News Feed. You can add your Business Page as a “Favorite” item here — similar to bookmarking a web page in your web browser — for easy access.
The basic skeleton of your Business Page is now live. Facebook will ask if you’d like to “Like” your Page. Again, I recommend avoid doing so at the moment. This activity will appear in News Feeds of those you’re connected to personally to on Facebook. Without any content on the Page, we want to save that organic Timeline story for when you’re really ready for people to view the Page.
In the top navigation, you’ll see an option for “Settings.” Click that. Along the left side, a vertical navigation bar with different sections should appear. We’ll focus on three core ones now:
Now it’s time to actually publish content to your page.
The rest of your Page will populate over time as you publish more updates.
When posting on your page, just be sure to use a variety of content. You can also click the little grey arrow in the top-right corner of each post and then click “Pin to Top” to move one of your posts to the top of your Page’s Timeline for seven days.
This is the large, horizontal image that spans the top of your Facebook Page. Typically, this is a branded image to help attract people to your Page. The official photo dimensions are 851 x 315 pixels.
Now that there’s content on the page, you can start strategically inviting users to “like” it.
With content published and users invited, you can go to the “Activity” tab in your Page’s top navigation to monitor how people are engaging with your Page and content.
Finally, we need to measure our efforts to ensure we’re making valuable marketing decisions on Facebook. Fortunately, Facebook has embedded in some decently helpful metrics for us to take advantage of. Simply click the “Insights” option in the top navigation to see the following:
Social media platforms are constantly evolving their algorithms and interfaces. Content creators and marketers need to be proactive and stay updated with the latest information.
Though a small element of the entire user experience, image sizes matter a lot on social media. The wrong image dimensions can result in ill-fitting or cropped content. Worse still, the target platform might reject your carefully-edited images if they’re not optimized for size.
Below is a Twitter image size cheat sheet with updated information. The guide covers all of the following and you can jump straight to the section you find relevant:
Best Image Sizes for Social Media
Twitter cards are tweets that have a title, description and a thumbnail image, which is designed to give viewers a preview of the content before clicking through to the featured website. When social media followers share this content on Twitter, the image, video or other media will appear directly in the interface, creating a more visual brand experience. In fact, Twitter cards are more likely to gain increased exposure through retweets.
The best news is that your school websites already have this functionality available! If you have your school website tied to your Twitter account, Twitter Cards are also enabled by default.
The obvious choice of social network is the one who your visitors are. So, who are they?
The more detailed the better.
Fun Facts:
Demographics:


Click to View Examples of the Different Layouts
Full Window
<div id="adobe-dc-view"></div>
<script src="https://documentcloud.adobe.com/view-sdk/main.js"></script>
<script type="text/javascript">
document.addEventListener("adobe_dc_view_sdk.ready", function(){
var adobeDCView = new AdobeDC.View({clientId: "8049c0dbf648467d9abbdcd54d4f89ff", divId: "adobe-dc-view"});
adobeDCView.previewFile({
content:{location: {url: "https://documentcloud.adobe.com/view-sdk-demo/PDFs/Bodea Brochure.pdf"}},
metaData:{fileName: "Bodea Brochure.pdf"}
}, {});
});
</script>
Sized Container
The height and width values can be modified to change the size of the container.
<div id="adobe-dc-view" style="height: 360px; width: 500px;"></div>
<script src="https://documentcloud.adobe.com/view-sdk/main.js"></script>
<script type="text/javascript">
document.addEventListener("adobe_dc_view_sdk.ready", function(){
var adobeDCView = new AdobeDC.View({clientId: "8049c0dbf648467d9abbdcd54d4f89ff", divId: "adobe-dc-view"});
adobeDCView.previewFile({
content:{location: {url: "https://documentcloud.adobe.com/view-sdk-demo/PDFs/Bodea Brochure.pdf"}},
metaData:{fileName: "Bodea Brochure.pdf"}
}, {embedMode: "SIZED_CONTAINER"});
});
</script>
Inline
The width value can be modified to change the size of the container.
<div id="adobe-dc-view" style="width: 800px;"></div>
<script src="https://documentcloud.adobe.com/view-sdk/main.js"></script>
<script type="text/javascript">
document.addEventListener("adobe_dc_view_sdk.ready", function(){
var adobeDCView = new AdobeDC.View({clientId: "8049c0dbf648467d9abbdcd54d4f89ff", divId: "adobe-dc-view"});
adobeDCView.previewFile({
content:{location: {url: "https://documentcloud.adobe.com/view-sdk-demo/PDFs/Bodea Brochure.pdf"}},
metaData:{fileName: "Bodea Brochure.pdf"}
}, {embedMode: "IN_LINE"});
});
</script>
Light Box
<script src="https://documentcloud.adobe.com/view-sdk/main.js"></script>
<script type="text/javascript">
document.addEventListener("adobe_dc_view_sdk.ready", function(){
var adobeDCView = new AdobeDC.View({clientId: "8049c0dbf648467d9abbdcd54d4f89ff"});
adobeDCView.previewFile({
content:{location: {url: "https://documentcloud.adobe.com/view-sdk-demo/PDFs/Bodea Brochure.pdf"}},
metaData:{fileName: "Bodea Brochure.pdf"}
}, {embedMode: "LIGHT_BOX"});
});
</script>
PDFs have allowed people to collaborate and share ideas across devices since 1991. But we have also come to use them in cases where they are not the best choice for displaying content on the web. Rather than creating a page with content, someone uploads a PDF.
This poses a whole slew of issues. From ADA-compliancy to mobile-friendliness, your PDFs could be hurting your school’s website.
Here are some major reasons why you should start thinking about how you are using PDFs on your site.
If you have a document with just text or text mixed with decorative pictures, the pdf will automatically be *mostly* compliant. However, there are some bad habits still lingering about:
In the cases above, the resulting PDF is 0% ADA compliant, because all the scannable text has been removed from the document. Also you are causing yourself a lot more work in the long run. All of the items listed can be done much more easily on a web page.
While at first glance, it may appear easier to upload a PDF — due to limited staff or training — this process is creating a lot more work for you.
When you create a PDF first, and then upload it to your website, you’re essentially duplicating your efforts. In most cases, you already have website tools (and in some cases, content) available to you on your website to make the exact same thing.
Rather than creating a PDF version first, and then distributing it online, think about how you can use your website tools to display this information dynamically. Therefore, if there is a change, you don’t need to edit the original document, re-export, and re-upload.
For example, many schools use Modern Events Calendar to share the school calendars. So, if there is a change, you can edit it in one location online, and publish it everywhere — rather than spending time editing a document elsewhere and re-distributing.
This same theory and strategy can be applied to virtually any PDF you wish to post on your website.
While a PDF will, of course, scale to fit the size of your device — it’s not actually responsive. This means users need to pinch and zoom around to find the information that they are looking for. In addition, unless you’ve added dynamic links to the document, viewers cannot click to call or visit links you’ve provided in the PDF itself, thus, hindering that seamless online experience we all strive for.
While this may not apply to every PDF you wish to create, in many cases, PDFs are intended to promote an event. When you upload a PDF, or use a PDF as your primary source of content, you instead make it hard for your website visitors to act immediately on something — and also adding extra clicks to view small snippets of information.
Of course, PDFs can be of value. We use use them to post school board minutes and student handbooks, etc.
The tricky tricky thing that gives people the most trouble by far with Acrobat has to do with creating a form that is not only fill-able, but that can be saved and will retain the entered data, even for people who only have Acrobat Reader. This is a very easy thing to do, but it is not well published. In order for the option below to work, you should start from the original file that the pdf was created from (Word, etc.) Doing this to an already created pdf file requires an extra step. If you are starting from a pdf file, follow the instructions below except you must save it once as a new file before doing the steps below. It sound silly, but if you don’t, the menu option outlined below will be greyed out.
Once you have converted your form from Word, and are ready to save it, select “Save As”, then “Reader Extended PDF”, then “Enable Additional Features” (Figure 1).
 Figure 1
Acrobat will display a popup (Figure 2), just select “Save Now” and save your document. That’s it!
 Figure 2


Our wordpress installations come with many custom features, one of which includes the ability to replace files with newer ones.
Because people create bookmarks and hotlinks and all sorts of page links directly to your files, it is ALWAYS best to have a URL for each important file that will never change.
Adding a Permanent File
To accomplish this, the first time you post a document, make sure you use a generic name. For instance, a Dress Code document would be called “Dress-Code.pdf” or even “Dress Code.pdf”. When this is uploaded to WordPress, the spaces will automatically be taken out and it will become “Dress-Code.pdf”. Once that is in place, it will have a static URL (web address) that can be used to link from various pages or links menu, etc.
Next year when the file needs to be updated, instead of posting an all new file, and having to relink every reference to the file, just go into the “Media” area, and find your file (if there are a lot of files, use the search to find it). There is a button called “Upload a new file”. Click this, and replace the old file with the new one.
The static URL (web address) will remain the same as before, so any links to the old file do not have to be updated.
Old files do not need to be archived on the website, if you wish to keep an archive of all the past dress codes, or other documents, the proper place for this is a file share or other method. The School Website should only have the most up to date document that is applicable at that given time.
Replacing a File
Upload a document to “Media” and create a link to it from your sidebar or web page (the method for uploading and linking is in the previous tutorial).
To replace the file, go into “Media” and search for the file you wish to replace. Click edit to open the file for editing. With the file open for editing, click the “Upload a new file” button.

You will then be presented with two options:

Most times, you’ll just browse for the file, and leave the default on “Just replace the file” and click “Upload”.
However if you had named the file poorly before, and wish to update to a more generic name, you can do so by browsing for the file, then select “Replace the file, use new file name and update all links” and click “Upload”. This will replace the existing links with the new file name and relink all the references to your old file automatically!!
Validating a website is the process of ensuring that the pages on the website conform to the norms or standards defined by various organizations. Validation is important, and will ensure that your web pages are interpreted in the same way (the way you want it) by various machines, such as search engines, as well as users and visitors to your webpage.
Conforming to standards and regulations is one of the many ways you can make your website universally understood. Make sure your codes and styles validate across the board. That means they have to meet the “strict” standards set by the W3C Organizationand pass a variety of validations for CSS and XHTML.
Not all validators check for the same things. Some only check CSS, others XHTML, and others for accessibility. If you are sincere in presenting standardized pages to the public, test them with several validators. The World Wide Web Consortium sets the standards and also hosts a variety of web page validators.
In simple terms, validation ensures that your website complies with the standards accepted by most web designers. That also means that it will be accessible to more people, across more web browsers and operation systems. Having an accessible website is also regarded as good web design practice. As you can see, having a validated website has its definite plus points.
To help you validate your WordPress site, here is a quick checklist:
https://www.deque.com/accessibility-beginners-guide/
https://www.w3.org/WAI/fundamentals/accessibility-intro/
https://www.w3.org/WAI/people-use-web/
https://www.w3.org/WAI/perspective-videos/
https://forestviewacademy.co.uk/
https://www.woodstockschool.in/
Need to pass on your page to someone else? Need to add someone else to help with Facebook?
It’s very easy to give someone permission to edit your Facebook page, or transfer to someone else if you’re leaving.
Simply go to “Settings” and “Page Roles” (on the left) when you are on the page (this is easier to do from a computer, not a phone, the menus are in a different spot and harder to find).
What will come up next is a page that looks like this:
In this area, paste the person’s Facebook account name and when they show up in the dropdown, click it.
THIS IS VERY IMPORTANT, YOU MUST CLICK THE NAME IN THE DROPDOWN.
The account name is the name after the facebook URL in someone’s profile. For instance, mine is at https://www.facebook.com/samanthadotnet (samanthadotnet)
Next, select the role level from the list of choices. If you are adding a user who will help you, then select Editor. If you are adding me, please give me “Admin”. You will have to enter your Facebook password again to complete the action.
Now the other person can remove you (if they are taking over the page).
If you are still having problems, please contact me at samantha.davis@stlucieschools.org
If you created a Facebook account solely for the purpose of managing your school’s page, you probably aren’t interested in using Facebook on a personal level. If this is the case, below are steps to lock your account completely. You will still been “seen” on Facebook but nobody can see any of your activity and nobody can send you friend requests. If you don’t do this, as soon as you create an account, Facebook will start suggesting you to people that it thinks might know you.
http://www.wikihow.com/Stop-All-Friend-Requests-on-Facebook
Another resource with more privacy settings:
If you created an account and named it the name of the school or something that is not “you”…you will run the risk of Facebook deleting your account. It is against their policies to be anything other than “yourself”. Your account will be deleted without any warning at all, and if you are the sole administrator of a page, the page will be deleted as well…without any warning, recourse, or chance to retrieve it.
Please note as well that Facebook does periodically change their privacy settings and in the past this has caused privacy settings to change. In order to maintain your privacy settings level, be sure to note any privacy update notifications that Facebook sends and manage your account accordingly.
Setting a custom page name and URL is extremely important on Facebook, and makes your page look much more professional. Your page name and url are shown below….this is what they should look like (much cleaner!) and the second image shows what they look like by default (not what you want!):
Setting this up is very easy! Simply click area circled in the picture above (“Create Page @Username”) and put in the name of your school (see the screenshot below). No spaces or special characters are allowed. PLEASE USE THE FULL NAME OF YOUR SCHOOL. In this circumstance, it does not matter how long it is, and using your full name is preferable, since this is how people will search for you on Facebook.
Please do not try to be clever here. Using a mysterious name to “hide” your page from everyone but the people you want is not a strategy. And you are only allowed to change your page ID ONCE. That’s it. PLEASE DO NOT TRY TO BE CLEVER HERE. Do not use the mascot name, abbreviations, or any other clever trickery. You need to spell out the name of the school or nobody will find your page.
Please do not shorten your name, abbreviate your name, or include St. Lucie in your name (unless your name has St. Lucie in it :P). If you have trouble using your name and Facebook says you can’t use that name, try with or without the “School”, IE: If BayshoreElementary does not work, try BayshoreElementarySchool. Or the reverse. The ONLY acceptable revision should be with our without “School”. If you continue to have issues trying to pick a name that Facebook allows, PLEASE CONTACT ME and I will assist you with choosing a name.
Make sure your facebook page is in tip-top shape for the coming school year!
ON THE INTERNET, ALL CAPS IS CONSIDERED “YELLING”.
For this reason, it is not appropriate to use all caps on your web pages, it is preferred to use h1, h2, h3, etc. depending on the size you need. You may also use it sparingly for emphasis, however typically italics and/or bold is best.
On a website, underlines are links! When text is underlined, website visitors assume it’s click-able and may try to click it! Please do not use underlines anywhere on your pages, under any circumstances. There is absolutely no reason whatsoever to underline text on a web page. Text that represents a link is automatically underlined by the browser.
Settings > Messaging
One of the down sides of social media is its 24/7 nature – when you shut down your computer and head home at 5pm, your Facebook page is still working. Traffic to Facebook actually spikes in the evening on many pages as users are browsing their newsfeed on a smartphone or tablet while relaxing at home in the evening…
I woke up this morning to a notification on my phone received at 00:39 – someone had sent a Facebook message to one of the pages I manage overnight. Unsurprisingly I was asleep at the time so didn’t see it until I checked my phone in the morning, but Facebook has registered this as ignored for seven hours which isn’t good customer service.
One way to manage this is to set-up instant replies on your Facebook page – click the ‘Settings’ heading at the top right corner of your page, write your Out of Office reply within the ‘Messaging‘ section and it’s sent to anyone who messages your page out of hours.
Settings > Page Roles
If you have Admin rights to a Facebook business page, you can add new users who can add content to the page and help you manage it. There are five different types of roles for people who manage pages:
To add a new user to your Facebook page, click the ‘Settings’ heading in the top right hand corner and then choose ‘Page Roles’ from the menu on the left.
To add someone, type the email address they use to log into Facebook, choose their access level then hit Enter. They will receive a notification from Facebook that someone has given them admin rights to a Facebook business page.
Quick note: Be careful who you add as an Admin – they can remove other page Admins and even delete the page – and also make sure that anyone added as an Editor knows the guidelines on what to post
Settings > Post Attribution
When you publish a post on your Facebook page, you want it to come from your business, not from your personal account.
Hitting publish to then see your personal profile picture (the one of you and the kids on the beach last Summer) might not quite be the professional look you were going for….
*Cringe*
To make sure all posts appear correctly, check the Post Attribution settings and tick the button that tells Facebook that every time you’re on your business page and you post something, it defaults as being by the business page.
About > General > Username
Take a quick look at your Facebook business page now – what does the URL in the browser bar look like?
If it’s something like this:
https://www.facebook.com/my-lovely-page-162166373456878/
(see all the numbers at the end?) then you’re missing an opportunity. In less than a minute you can easily change the web address of your Facebook page to something a bit more memorable, like www.facebook.com/my-lovely-page
Click the ‘About’ tab below your Facebook cover photo, then click the Facebook Web Address option and type whatever you’d like to appear after the Facebook.com URL.
If it’s available, Facebook will ask you to confirm the change, then immediately you’ll have your own lovely personalized URL.
Insights > Posts
One question I get asked all the time is “When is the best time to post to Facebook?” And my answer, every time, is “it depends”.
I know that’s a frustrating answer, but your audience might be different to mine so I can’t tell you when they’re most likely to see your post.
The only way to find that answer is to look at your Facebook insights data.
This information is easy to access via the ‘Insights’ tab at the top of your Facebook page; click the ‘Posts’ heading in the left menu.
Scroll down on this page and you can also see which of your posts have the greatest reach.
The simple takeaway from this chart is: do more of what’s working. Identify the posts which reach most people and publish more like them.
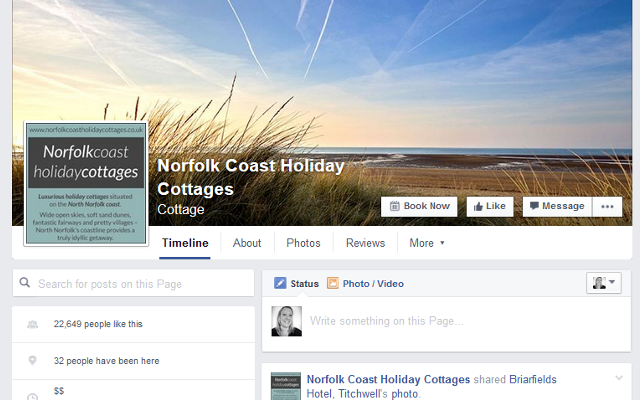
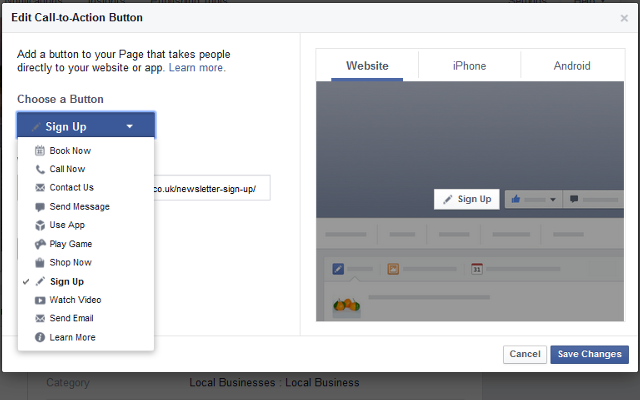
Dropdown below Cover Photo >Edit
The Norfolk Coast Holiday Cottages page prompts visitors to ‘Book Now’ via the button on their Facebook cover photo:
There are currently 12 options for your Facebook cover photo button, each with different ways to customise what happens:
To edit yours, click the button, select from the dropdown menu and follow the steps.
Settings > General > Visitor Posts
Social media, by its very nature, is social, which means it’s two-way communication, so you will most likely receive comments and posts from other people on your page.
This interaction indicates to Facebook that your page is interactive and therefore engaging, which helps you reach more people.
Check your settings to ensure you have enabled other people to post on your page. PLEASE TURN OFF PHOTO AND VIDEO POSTS (Unlike the picture below):
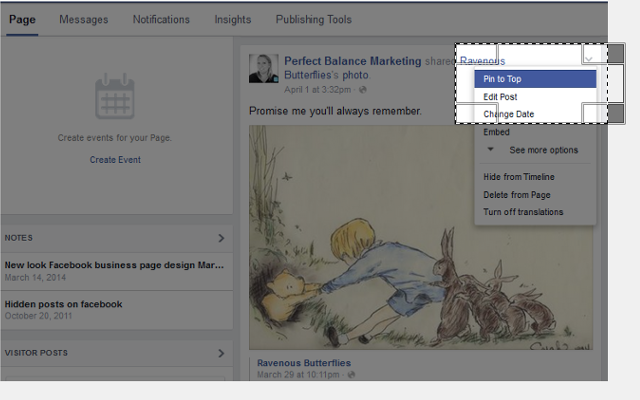
Click 3 dots on post then ‘Pin to Top’
Social media is fast-moving – as soon as you’ve published something it gradually gets pushed down the newsfeed as new more topical posts get published.
One way to get your message seen long after it’s published is to pin it to the top of your newsfeeds – this means that even when you publish other content, this post will stay at the top of your feed until you remove it.
Examples of posts you might want to pin to the top of your feed:
Click Cover Photo > Add Description
Did you know you could add a link to your About page to your cover photo?
This means that if anyone’s interested in finding out more about you, they can click easily through to your website from your Facebook page. You can even link to a special offer or a sign-up form to join your email list from your cover photo or profile pic.
To add the link, simply click on your Facebook cover photo (the big pic at the top of your feed) or your Facebook profile pic, then click ‘Add a description’ to the right of the photo. Here you can type in more information about your business, and paste in a link to a relevant page of your website.
Settings > Featured
The featured pages section is a great way to show off some other Facebook pages that serve the same audience as you and that you would like to support.
By showcasing a few related pages on your Facebook business page (on the left-hand side of your page, as shown below), you’re adding value to your audience and showing them some additional places where they can find content that they might find interesting.
To add featured pages, visit your ‘Settings’ again and select ‘Featured’ from the menu on the left.
You can choose a few to feature from all those that you’ve already ‘liked’ in the past by clicking ‘Edit Featured Likes’.
Keep up with all the changes to Facebook can be a challenge, but you know I love to keep you up-to-date with any changes that could affect your business so hopefully this post has been useful.
I’ve also created a super helpful checklist that you can download for free on the link below – once you’ve downloaded it, simply print it out and complete it as you work through your Facebook page settings.
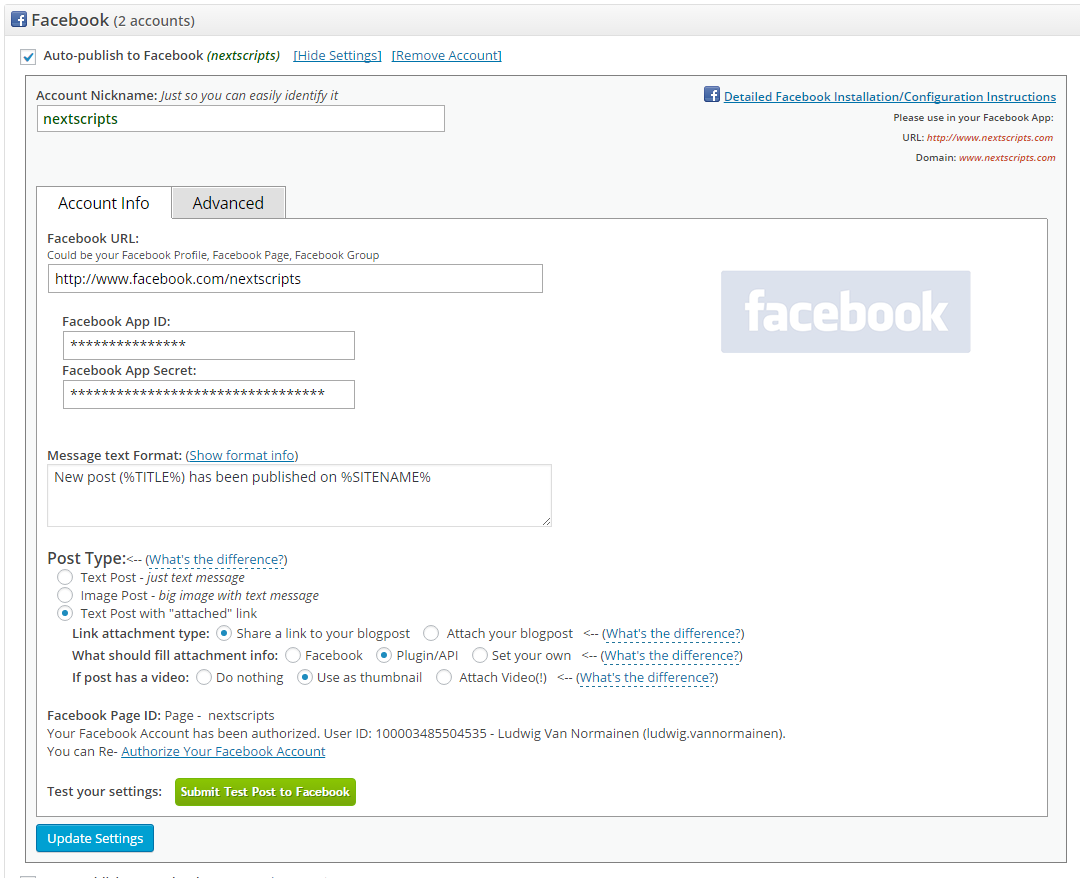
The best way to create an app on Facebook is to make samanthadotnet an administrator in “Page Roles” under your page settings. Then Request an App
If you would like to try it on your own:
To create an app requires becoming a developer on Facebook. This operation is tied your personal account, and requires text message validation through your cell phone, which will then be associated with your personal Facebook account. Once you are a developer, you can create Facebook apps for any pages that you manage.
If you wish to become a developer, then please follow the steps below.
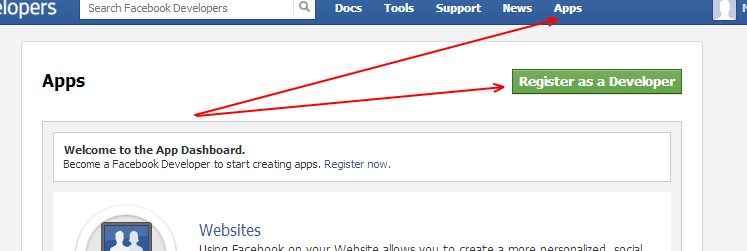
Login to your Facebook account.
Go to the Developers page: https://developers.facebook.com/
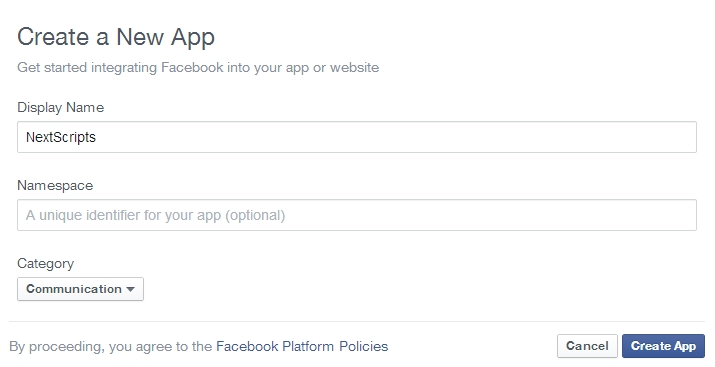
1. Click green button “Register as a Developer”:
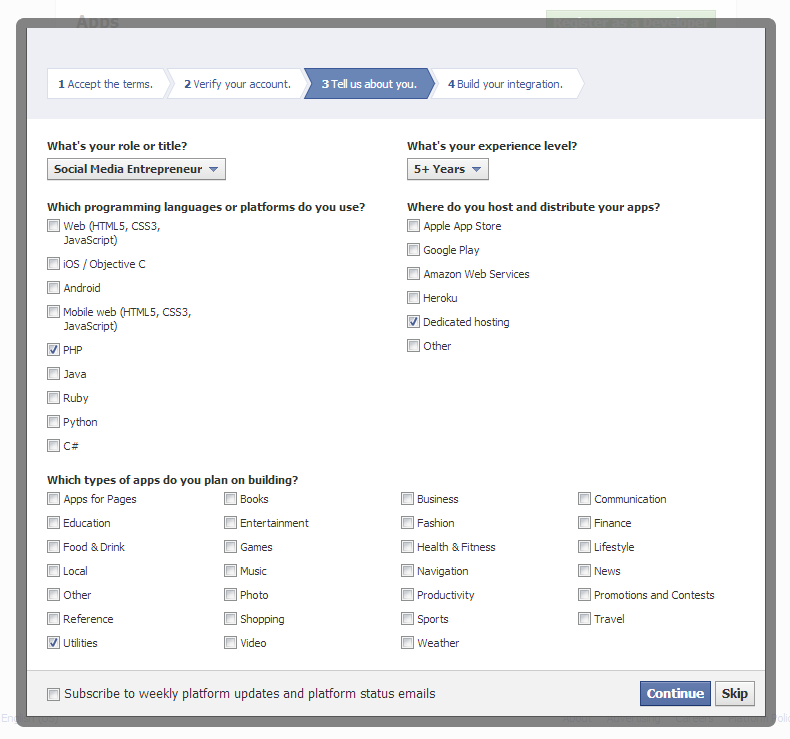
2. Accept the policy, click “Continue”:

3. Confirm your phone number:

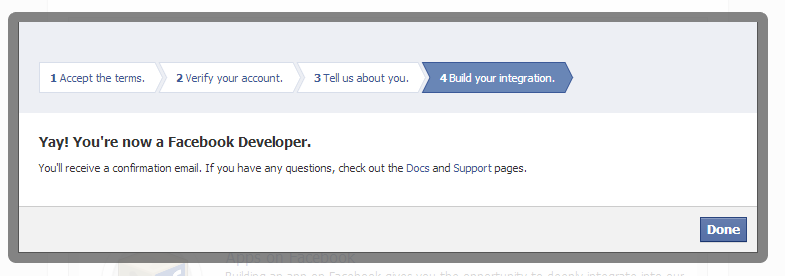
5. You are now a Facebook Developer. Now you can create an app (see instructions following.)
FAQ: Question: Why I can’t create an app on developers.facebook.com/apps ? When I am trying to enter that page it redirects me back to my account!
Answer: Facebook “Business” or “Advertising” accounts can’t manage apps. Only real user accounts are able to create and manage apps. Please login to Facebook as a personal account to be able to create app.
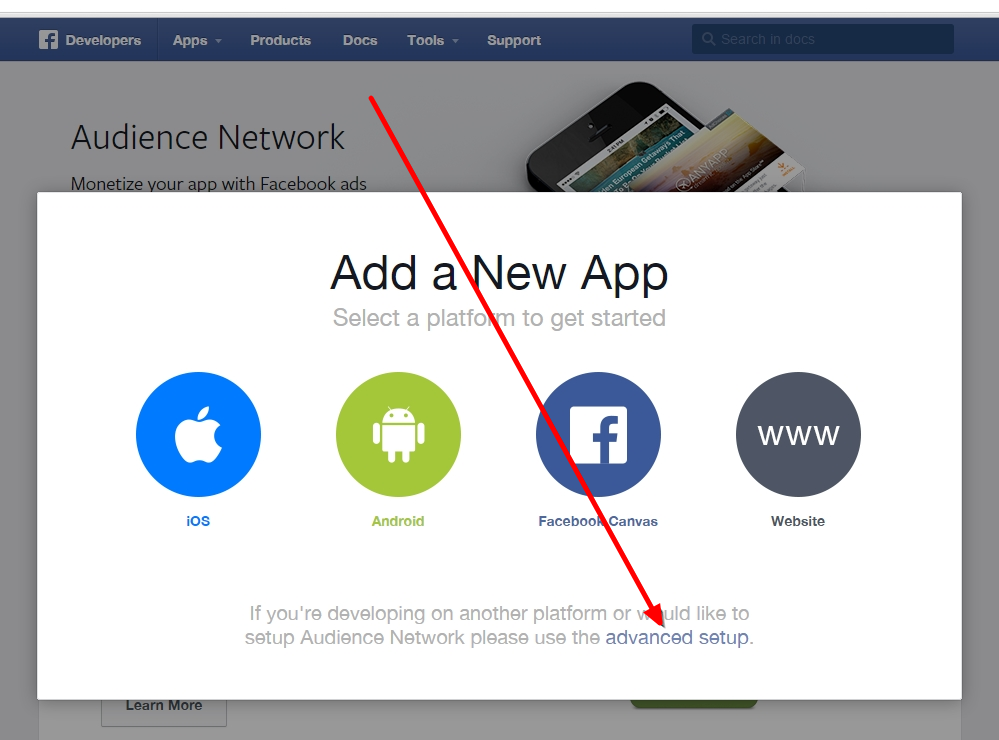
3. Click “Apps -> Create a New App” menu item.

The new wizard is actually much more complicated to setup to what we need, so click “Advanced Setup”.
Fill “App Name”, leave “App Namespace” empty, select any category. agree to policies and click “Create App”, fill captcha, click “Submit”.
Important: Please use your own information, don’t literally re-type “NextScripts Blog”, “NextScripts.com” and other sample info.
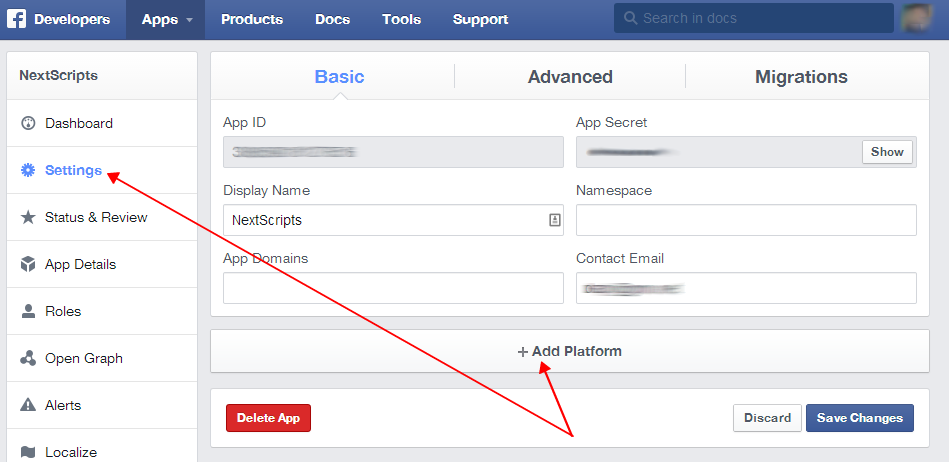
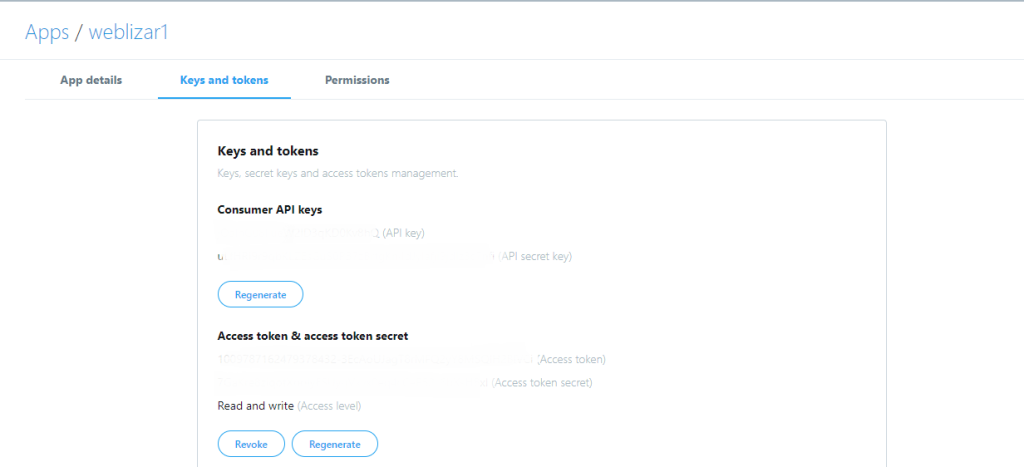
– Notice App ID and App Secret (Click “Show”, enter your password) on this page.

4. Click “Settings” on the left, fill “Contact email” field, then click “Add Platform”.
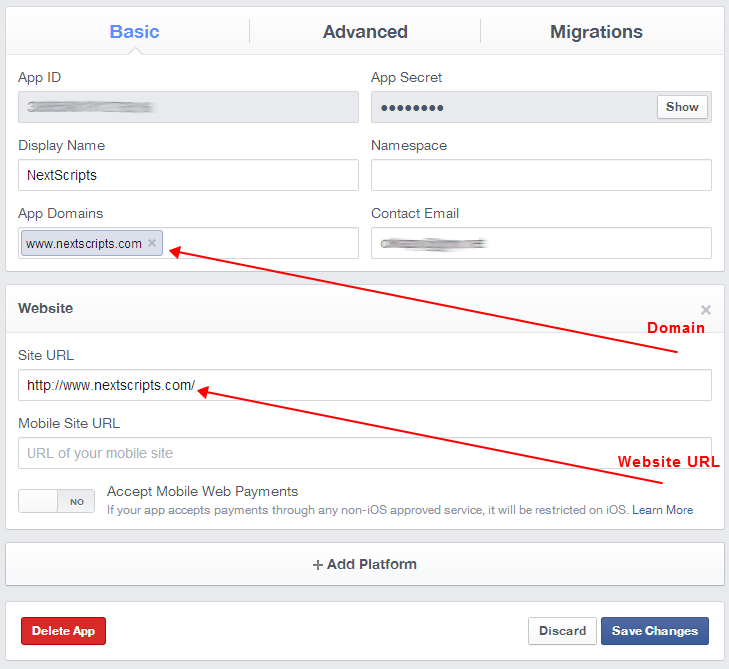
5. Select “Website” in the list.

Enter your website URL to the “Site URL” field. Enter your domain to the App Domains. Domain should be the same domain from URL that you have entered to the “Site URL”.
Important!: You must enter the URL and domain that you see in your WordPress Admin Panel. For example your visitors come to your blog at http://www.yourdomain.com, but you manage your blog from http://www.yourdomain.com/wp-admin/ – you must enter http://www.yourdomain.com to the URL Field and www.yourdomain.com as the domain. Also please note that yourdomain.com and www.yourdomain.com are two different domains.
Important!!! Again, Please use your own information, don’t literally re-type the information below.
6. All Facebook apps are “Sandboxed” by default. All posts will be visible only to to Admins, Developers and Testers. You need to take an app “Live” if/when you would like your posts to be seen by everybody.
Click “Status & Review” on the lest. Change “Do you want to make this app and all its live features available to the general public?” switch from “No” to “Yes”.
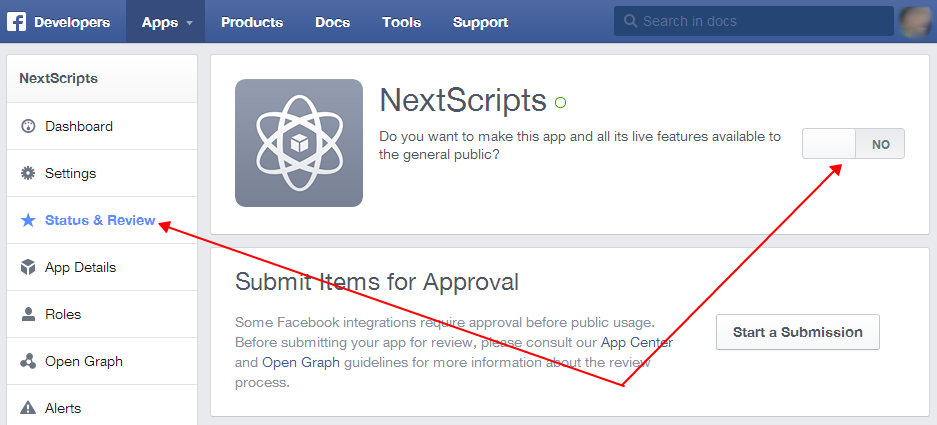
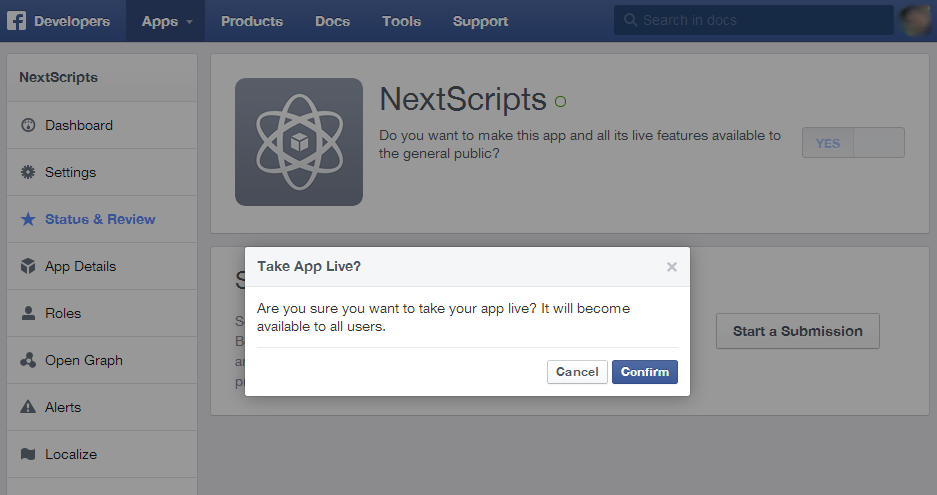
Just to avoid any confusion. You don’t need to submit your app for review and approval.
1. Login to your WordPress Admin Panel, Go to the Settings->Social Networks AutoPoster Options.
2. Click green “Add new account” button, select “Facebook” from the list.
3. Fill “Your Facebook URL” with your Community page or from step 6 above or your personal Facebook URL or your Facebook Group URL or your Facebook Business Page URL.
4. Fill “App ID” and “App Secret” from step 3 above.
1. Click “Update Settings”. Notice new link “Authorize Your Facebook Account”.
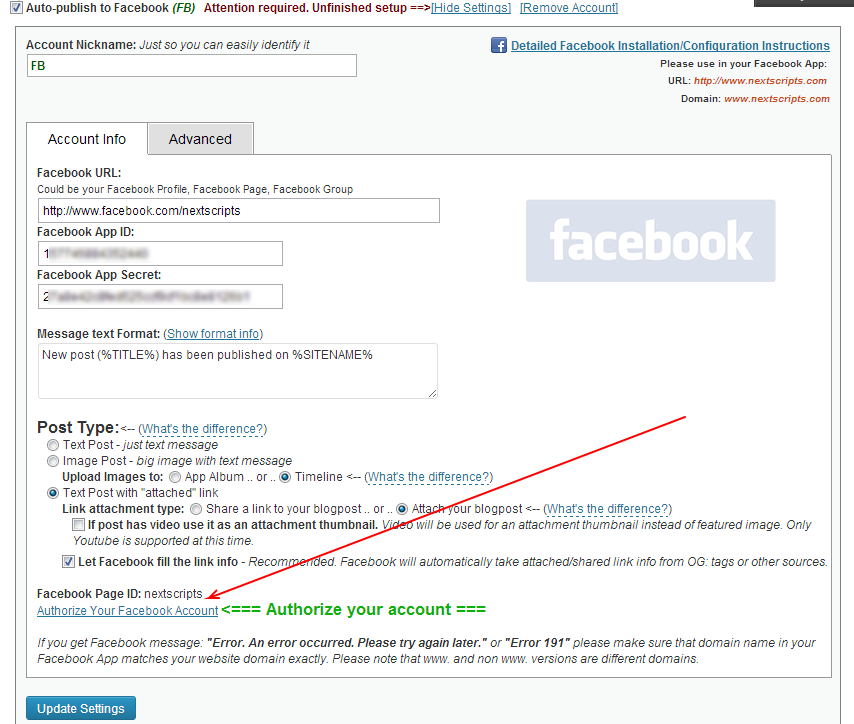
2. Click “Authorize Your Facebook Account” and follow the authorization wizard. Facebook will ask you series of questions. If you get any errors at this step, please make sure that domain for your WordPress site is entered to your App as “App Domain”.
Important #1: If Facebook tell you that you need to switch to your main account, you will need to close the wizard, go to facebook.com, switch account, and then start authorization from the beginning.
Important #2: Facebook changed some rules regarding the apps. This means that the Facebook App, Facebook profile or page and the user who authorizes the app MUST belong to the same Facebook account. So please make sure you are logged to Facebook as the same user who created the app.
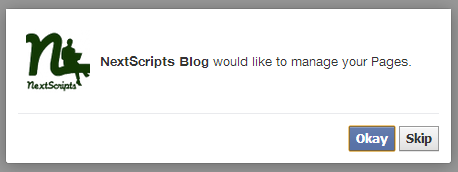
Important #3: When Facebook Authorization Wizard asks you for the access privileges to your profile/pages, do not uncheck anything and don’t click “Skip”.
Facebook don’t have the ability to request permission to just one page. It’s either all of them or none. If you click “Skip” it means you forbid Facebook from posting to any of your pages, groups or profiles. The plugin will post only to the page that you specify on the “Your Facebook URL” field.
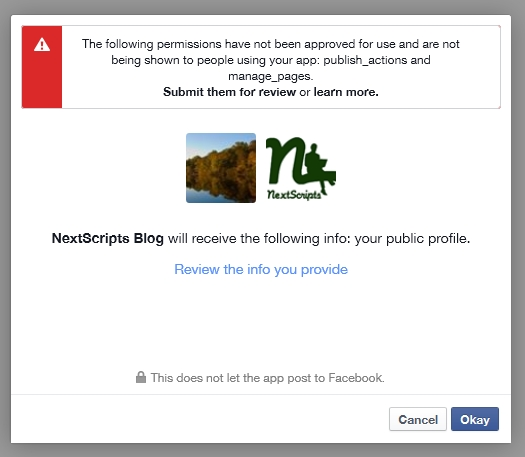
Note (Again): Please don’t pay attention to the red message on top of the screenshot above, you don’t need to submit your app for review if you will be posting to the profile and pages you admin.

4. Your Facebook account is ready to use.
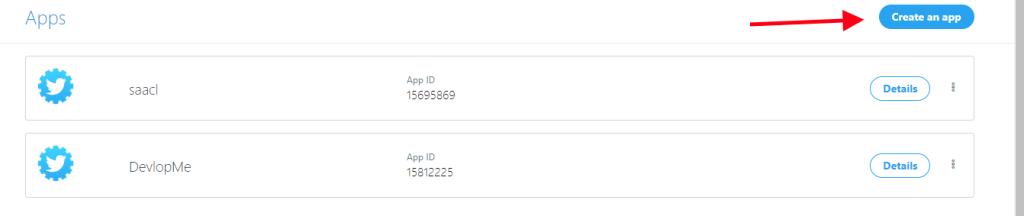
Make sure you’re logged in with the Twitter account that you’re creating the app for.
Navigate to dev.twitter.com.
If you are new to the Developers site you won’t see any applications registered. Either way, it’s time to create our first application. To do this, click on the “Create an app” button.
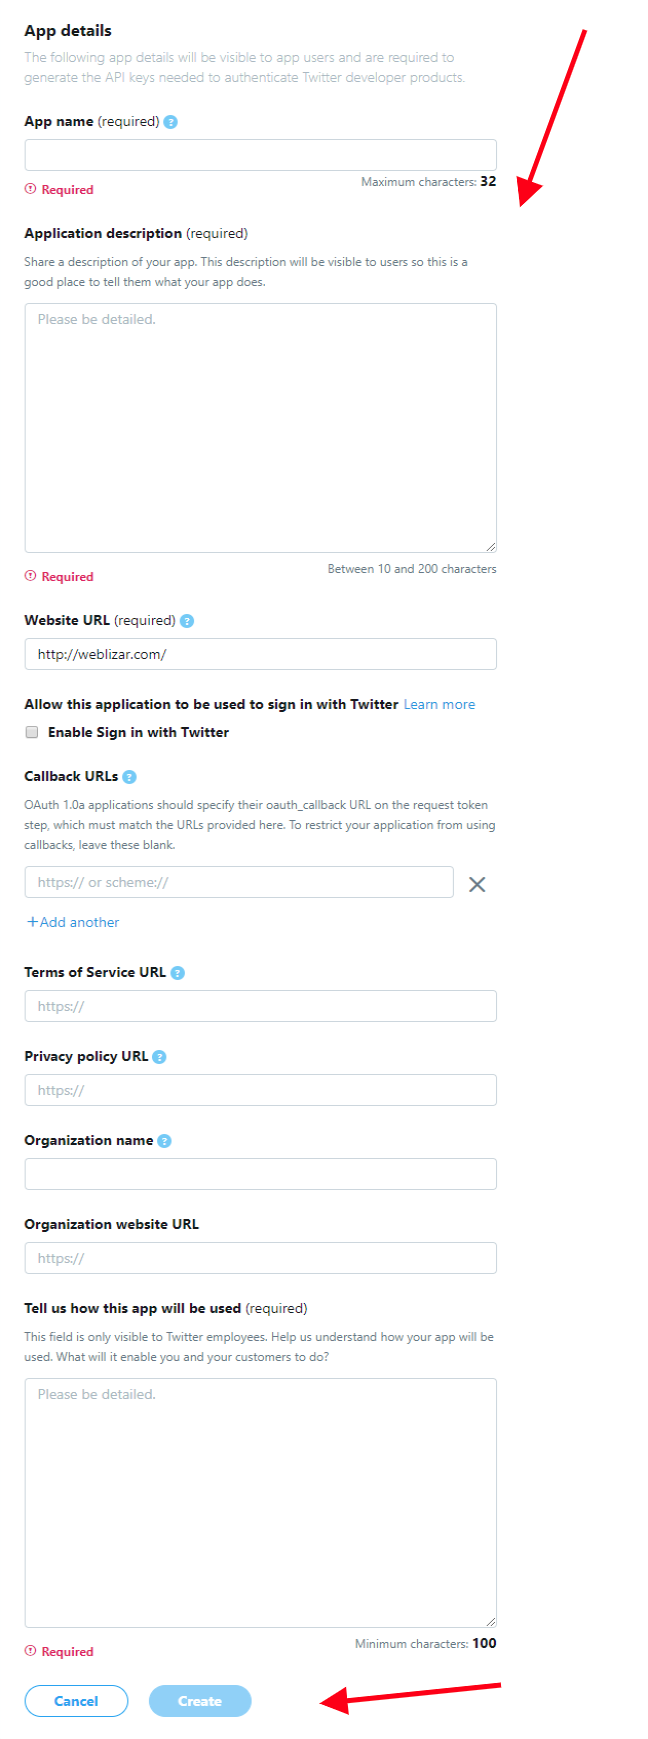
Enter the application name, description, website address, term & policy URL. After filling all the information, submit the form by clicking on the create button.

You will be on the App Details screen (below). To access your keys and tokens, click the link that says “Keys and tokens”:

On the Keys and Tokens tab, you will see the API Key and API Secret Key listed. Click the “Create” button to generate the access token and secret token.

Now all four API key, API Secret key, Access Token, Access Token Secret, codes have been generated.
These tokens will allow your application to read Twitter information. You’ll be able to get data of your tweets, mentions, lists and more.
There is a lot of conflicting information making the rounds on what can and can’t be done with regard to teacher websites, social media, school websites, etc. This is the first post in a series, where I will try to clear up all the misinformation!
There are many tools available to us for disseminating information to the public.
Skyward–All assignments should be here. There are calendar entries that can be configured for events (related to the permission level of the user–so school events would need to be done at that level not by a teacher). In addition, there is a “Facebook-like” messaging center. Skyward is the first place where information should be placed, when it comes to academics, classroom info, grading, assignments, and communication with parents and students.
School Websites–The next step up is the school website. Here is where overall information about the school is placed and all public information. ALL TEACHERS AND STAFF have access to post on the website! What this means is that teachers and staff can contribute news and events to the school website. It’s a matter of login, post, and the post goes to the webmaster for approval. If you have ever posted to Lucie Link, it is exactly the same!
The link to post can be found on this page (use the link for your school):
http://schools.stlucie.k12.fl.us/website-login-links/
Login with your network username and password.
School Messenger–Replaced ConnectED and is used to send out phone messages to parents/employees. Sending a message through this system needs to be approved by the principal.
Lucie Link–Anyone can post to Lucie Link. All posts are monitored/subject to approval. The link to post is: Lucie Link (login with your network username/password)
District Website–Generally content is supplied by district staff. Teachers and schools have Lucie Link, on the home page, right at the top…and it doesn’t really get any better than that! However if you do have content that you feel is valuable at a district level, please contact the district webmaster (that’s me!) at webmaster@stlucieschools.org
Photos and video – You cannot place photos or video of students on your site, period. There is no disclaimer that you can make or permission that you can employ that allows you to do this. Parents check a box on their application that constitutes a legal photo release for that student and the rights are granted for use on the district website or school websites. In addition to the release there are guidelines which should be followed. These can be found at http://www.stlucie.k12.fl.us/pdf/website-guidelines.pdf
Calendars – We have lots of calendars. Calendars in Skyward, calendars on the district website, calendars on the school website. If you have calendar events, please do not hide them on your teacher web page, more people need to know 🙂 Use Skyward for class assignment or project due dates. Use the school website for special things you’re doing. And if you link to the District Calendar, please link to the copy on the district website, do not download your own copy to link to. The link for the district calendar is *always* https://www.stlucie.k12.fl.us/pdf/School-Calendar.pdf so if you set your link to that, it will always be the current calendar.
Utilizing the drafts feature should prevent any need for creating place holder pages. Anything saved as a draft will not show up to the public. The purpose is to allow a page to be worked on and saved without actually posting it, or to allow the approval of content before the page goes live.
There is an extremely important reason why you don’t want to publish blank pages…the website software is integrated with Google search which means your site is going to be far more visible on the internet than previously. You do not want to be indexing blank pages or pages with duplicate information or you can be penalized by Google and your site pushed down in relative searches.
Having up to date, relevant content is extremely important, as well as clear and concise copy that is written for the web.
The other reason for not creating temporary pages is because of “permalinks”. WordPress creates links based on the title of your page or post. If you create a “Contact Us” page, it will name the page
http://schools.stlucie.k12.fl.us/yourschool/contact-us
If you later decide you don’t like that page and create another one, it will be named
http://schools.stlucie.k12.fl.us/yourschool/contact-us-2
This can be avoided by editing the original page rather than deleting and creating a new one. Versions of pages are saved as well, and this gets lost when the page is deleted.
Throughout this post, you’ll find the size and dimensions of every type of social media graphic you’ll be creating. But here’s the TL;DR cheat sheet:
YouTube
On various social networks, you can create a smorgasbord of posts. Here’s a list of visuals you can make and publish on different networks:
Profile image
The profile image displays at 170 x 170 pixels. You need to upload a square, but the final image will appear as a circle. (This seems to be the case across the board for each social media channel in this post.) You can upload images up to 2048 x 2048 pixels for higher quality. It’s best to use a headshot or logo here.
Cover Photo
The cover photo measures 820 x 312 pixels. You can also upload videos.
In-feed images
These are images that appear in the Facebook newsfeed. The recommended size is 1,200 x 628 pixels. But Facebook will resize them in the feed to have a maximum width of 680 pixels, and the height adjusts according to the width. Users can view a larger version if they click on the image. Uploading a larger image improves the sharpness, even though Facebook reduces the size.
Stories
Facebook Stories are a popular format. They measure 1,080 x 1,920 pixels and take up the entire mobile screen. Stories are popular for two reasons. One is that they appear at the top of the feed and people see them as soon as they log in. While the other is that they only last 24 hours and people want to get a peek before they disappear forever. The FOMO is real.
Link thumbnails
The ideal thumbnail size is 1200 x 628 pixels. The minimum size is 560 x 292 pixels, and the aspect ratio is 1.91:1. Using images of this size will ensure that the large thumbnail appears when you share a link.
You can only publish images and videos on Instagram. This is why it’s imperative to create the best images. But you won’t magically get powerful results just because you publish beautiful images. Your success hinges on how well your images educate or entertain the Instagram crowd.
Profile picture
It displays at 180 x 180 pixels. You will need to upload a square image, but it shows as a circle.
In-feed posts
Ideal sizes vary for square, portrait, and landscape images.
Square image size: 1,080 x 1,080 pixels.
Portrait image size: 1,080 x 1,350 pixels.
Landscape image size: 1,080 x 566 pixels
The dimensions you choose should depend on the image you are making. I find that square images work best most of the time because they’re perfectly sized for Instagram’s grid gallery format. However, this study from Dash Hudson found that portrait images may actually do best. Square images came in second and landscape images came in last. The differences aren’t monumental, but they can add up over time.
Stories
Instagram stories are 1,080 x 1,920 pixels, and they take up the whole screen on mobile. Just like Facebook stories, they vanish in 24 hours.
You can also overlay interactive stickers, such as questions, polls, countdown timers, and quizzes.
Highlights:
Instagram stories last for just 24 hours. After that, they’ll appear in your archive. You can restore them any time and place them under your bio as highlights with a cover photo.
Cover photos are circle-shaped, but you need to upload a square image. It should be 180 x 180 pixels, just like the profile image. But you can upload a larger image for better quality. Because the bio is limited to very few characters, you can use highlights to inform people about your business.
As you might guess by now, images get more retweets. Many of the most retweeted tweets are images.
Profile picture
A circle profile picture is displayed, but you should upload a square image. The recommended dimensions are 400 x 400 pixels.
Header image
The header image appears at the top of the account. It has to be 1,500 x 500 pixels.
Tweet images
The ideal image size is 1,200 x 675 pixels.
Link thumbnail
The ideal Twitter link thumbnail size is 800 x 418 pixels. But the image you use for the Facebook link thumbnail will work because the aspect ratio is the same (1.91:1).
Pinterest is probably the most image-centric social network. You can publish videos here too, but images make up the significant chunk of content.
Profile picture
This should be a minimum of 180 x 180 pixels. The recommended size for uploading is 600 x 600 pixels. Here too, it’ll unfold as a circle even though you must upload a square.
Cover image
You can see the cover image at the top of the profile. The ideal image size is 1,600 x 900 pixels, but you can also use video. If you don’t want to use an image or video, you can display your latest pins.
It’s a nice way to give potential followers a sneak peek of what they’ll see if they follow you. Make sure you pin top-quality images if you plan to display your latest pins.
Board covers:
You can also add covers to your boards. These should be 200 x 200 pixels.
Pin image size
The ideal Pinterest image size is 1000 x 1500 pixels, and the aspect ratio is 2:3. Portrait images do well on this site.
Portrait images do better on Pinterest because of the way the feed appears. On most social networks, posts appear one below the other. On Pinterest, they appear next to each other in columns. When you create a taller image, you have a longer column that overshadows smaller images, occupies more space, and attracts more attention.
Pinterest story pin size
You can publish story pins on Pinterest, but they’re different from stories on other networks. These pins appear in the feed, and show up as carousels with a minimum of 2 slides and a maximum of 5 slides. Story pins have to be 900 x 1600 pixels (9:16 aspect ratio).
Profile picture
LinkedIn recommends you upload a 400 x 400 pixel image.
Background photo
The LinkedIn background photo or cover image should be 1,584 x 396 pixels. The aspect ratio is 4:1.
Post images
Post images should be 1,104 x 736 pixels. This is for both pages and profiles.
Link thumbnail
Link thumbnails must be 1,200 x 628 pixels. It’s the same as Facebook. The recommended aspect ratio is also the same (1.91:1).
Most people think YouTube is a video social network or search engine where you can only publish videos. But there are several types of images you can post here. These include:
Profile picture
For YouTube, the final image ends up being 250 x 250 pixels in size, but you must upload an 800 x 800 pixel image. It gets cropped to a circle.
Channel art
The channel art is similar to a cover image on other networks as it soars over the channel. It should be 2,560 x 1,440 pixels.
Thumbnails
The thumbnail is 1,280 x 720 pixels. It appears on videos when people search for them or when YouTube recommends them in the feed. You also see thumbnails when you visit a channel.
End cards
End cards appear in the last five to twenty seconds of a video. You can place elements such as recommended videos, playlists, a subscribe button, and a link. You don’t need to place a background image, but adding one that’s 1,280 x 720 pixels helps reduce distractions.
Watermark
After the video starts, you can set the time at which your watermark appears. You might have seen a watermark on the bottom right corner of videos. When you scroll over this image, a subscribe button appears. Most people use their company’s logo or a call to action. Keep in mind that your image has to be 150 x 150 pixels at least.
Posts
You can post pictures in your channel’s community. YouTube suggests an aspect ratio of 1:1 since images appear as squares in the feed. I recommend a minimum size of 500 x 500 pixels.
Stories
Like on other networks, stories are 1,080 x 1,920 pixels and take up the whole mobile screen.


https://accounts.google.com/signup/v2/webcreateaccount?flowName=GlifWebSignIn&flowEntry=SignUp
Please sign up using your district email address, and do not create a gmail account.
Click to View Examples of the Different Layouts
Full Window
<div id="adobe-dc-view"></div>
<script src="https://documentcloud.adobe.com/view-sdk/main.js"></script>
<script type="text/javascript">
document.addEventListener("adobe_dc_view_sdk.ready", function(){
var adobeDCView = new AdobeDC.View({clientId: "8049c0dbf648467d9abbdcd54d4f89ff", divId: "adobe-dc-view"});
adobeDCView.previewFile({
content:{location: {url: "https://documentcloud.adobe.com/view-sdk-demo/PDFs/Bodea Brochure.pdf"}},
metaData:{fileName: "Bodea Brochure.pdf"}
}, {});
});
</script>
Sized Container
The height and width values can be modified to change the size of the container.
<div id="adobe-dc-view" style="height: 360px; width: 500px;"></div>
<script src="https://documentcloud.adobe.com/view-sdk/main.js"></script>
<script type="text/javascript">
document.addEventListener("adobe_dc_view_sdk.ready", function(){
var adobeDCView = new AdobeDC.View({clientId: "8049c0dbf648467d9abbdcd54d4f89ff", divId: "adobe-dc-view"});
adobeDCView.previewFile({
content:{location: {url: "https://documentcloud.adobe.com/view-sdk-demo/PDFs/Bodea Brochure.pdf"}},
metaData:{fileName: "Bodea Brochure.pdf"}
}, {embedMode: "SIZED_CONTAINER"});
});
</script>
Inline
The width value can be modified to change the size of the container.
<div id="adobe-dc-view" style="width: 800px;"></div>
<script src="https://documentcloud.adobe.com/view-sdk/main.js"></script>
<script type="text/javascript">
document.addEventListener("adobe_dc_view_sdk.ready", function(){
var adobeDCView = new AdobeDC.View({clientId: "8049c0dbf648467d9abbdcd54d4f89ff", divId: "adobe-dc-view"});
adobeDCView.previewFile({
content:{location: {url: "https://documentcloud.adobe.com/view-sdk-demo/PDFs/Bodea Brochure.pdf"}},
metaData:{fileName: "Bodea Brochure.pdf"}
}, {embedMode: "IN_LINE"});
});
</script>
Light Box
<script src="https://documentcloud.adobe.com/view-sdk/main.js"></script>
<script type="text/javascript">
document.addEventListener("adobe_dc_view_sdk.ready", function(){
var adobeDCView = new AdobeDC.View({clientId: "8049c0dbf648467d9abbdcd54d4f89ff"});
adobeDCView.previewFile({
content:{location: {url: "https://documentcloud.adobe.com/view-sdk-demo/PDFs/Bodea Brochure.pdf"}},
metaData:{fileName: "Bodea Brochure.pdf"}
}, {embedMode: "LIGHT_BOX"});
});
</script>
The tricky tricky thing that gives people the most trouble by far with Acrobat has to do with creating a form that is not only fill-able, but that can be saved and will retain the entered data, even for people who only have Acrobat Reader. This is a very easy thing to do, but it is not well published. In order for the option below to work, you should start from the original file that the pdf was created from (Word, etc.) Doing this to an already created pdf file requires an extra step. If you are starting from a pdf file, follow the instructions below except you must save it once as a new file before doing the steps below. It sound silly, but if you don’t, the menu option outlined below will be greyed out.
Once you have converted your form from Word, and are ready to save it, select “Save As”, then “Reader Extended PDF”, then “Enable Additional Features” (Figure 1).
Figure 1
Acrobat will display a popup (Figure 2), just select “Save Now” and save your document. That’s it!
Figure 2
Your school likely already has a twitter account. Please do not register multiple school twitter accounts. Contact the District to get access to your school Twitter account.
If you would like to have a separate twitter account for yourself:
Go to www.twitter.com to sign up. Enter the appropriate information (full name, email and password) on the right-hand side before clicking “Sign up for Twitter.”
The site will then ask you to verify the information, choose a username and agree to the Twitter Terms of Service before proceeding.
Build Your Timeline: Twitter is based on following and being followed, so the next step is choosing some interesting people to follow. Don’t overwhelm yourself at the start, choose a few of the suggestions based on your interests and then move to the next step.
Add Personal Info: Once you’re setup, Twitter will ask you to upload an image (maximum size of 700k) and provide a brief, 160-character bio about yourself.
Tweet. Just click inside the “Compose new tweet….” box in the upper left-hand corner of the home tab or click the blue feather icon in the upper right-hand corner at any time to get started. Remember, text is strictly limited to 140 characters.
Hashtags
The hashtag symbol (#) is a great way to mark specific topics or keywords in a Tweet. It was created by Twitter users as a way to classify messages and has since become a cultural phenomenon. All you have to do is place a hashtag in front of a word or phrase in your tweet. #Easy!
Mentions & Replies
Two more ways you can connect with other Twitter users. Mentions and replies are updates that contain “@username” anywhere in the body of the tweet. Place a “@” in front of the person, business, organization or whatever you want to mention or reply to. A recent change has made it so that your replies to someone will be seen only by mutual followers if you place their “@username” at the beginning of your tweet. If you want your followers to see your mentions/replies to someone, set the “@username” at the end of the tweet or put a period in front of the ampersand like this: “.@”.
Retweets
A retweet is a way to share another Twitter user’s tweet with all of your followers. It will essentially look the same as normal tweets with the author’s name and username next to it, but it will also contain the retweet icon and the name of the user who reposted it. Click the “Retweet” option under a tweet in order to share.
Favorites
Adding a tweet as a favorite is similar to liking something on Facebook. It’s a way to let the original poster know you liked their tweet for whatever reason. However, it also gives you a way to save a tweet so you can refer back to it later. Simply click the star icon with “Favorite” next to it in order to favorite a tweet.
A great website that explains how Twitter works:
https://www.momthisishowtwitterworks.com/
By cleverly targeting certain hashtags you’ll be more likely to start conversations, increase your engagement and ultimately get more followers.
Remember to have fun with it and keep an eye on your Twitter analytics to see what works best for you.
If you use a Twitter account and a Facebook page, you can connect Twitter to the Facebook page and update both of them with a single post. If you no longer want to post Twitter posts on the page automatically, turn off automatic Twitter posting by unlinking the two accounts. You can also remove all Twitter posts from your Facebook page.
1. Navigate your Web browser to Facebook. Expand the menu in the top right corner of the Facebook page and select “Account Settings.”
2. Click “Apps” in the left pane to view the list of apps that have access to your account.
3. Click the “Edit” link at the right of the “Twitter” app.
4. Click the “Remove app” link in the top right corner of the app information section.
5. Place a check mark in front of the “Delete all app activity” if you want to take all auto Twitter posts off Facebook.
6. Click the “Remove” button to unlink the two accounts and remove the Twitter posts.
Why it’s a bad idea to connect your Twitter to your Facebook account:
Twitter has made it deceptively easy to connect your Twitter account to your Facebook account, but don’t be fooled. It’s usually not a good idea. Twitter and Facebook are two very different networks. The people you’re connected to on Twitter expect different things than those you’re connected to on Facebook (even if most of them are the same group of people).
Twitter is a high-volume network, where you can tweet ten or twenty times a day. Because you are encouraged to follow lots of different people – those you know and those you don’t – and because you don’t require their permission to do so, Twitter is a more informal and loosely connected network.
Facebook, on the other hand, is much more personal. The volume of updates on Facebook is much, much less than on Twitter! People expect one, maybe two status updates a day, maximum.
The culture of both networks is different, so if you combine them you risk alienating your audience. By posting your tweets to your Facebook profile, you’ll inundate your Facebook friends with status update after status update, taking over their newsfeed and appearing spammy. Those 10 tweets will fit perfectly within Twitter’s real-time home timeline, but they’ll clutter up your Facebook wall and may even result in a block or an unfriending.
Rather than using Facebook it is HIGHLY recommended to use your website and push messages to your social accounts from there. These link back to your website, and drive traffic to it. The social sites affect the visibility of the website, and the website affects the visibility of the social accounts. These work together HARMONIOUSLY….they are not competition to see which has more visitors, or more likes, or more follows. There is traffic that will ONLY come to your website, they are not interested in your social accounts; and there is traffic that will only come via Twitter, or Facebook. But in any case, the bulk of the information about your school will be on your website. The final authority of what is accurate and current is what is on your website. For this reason, it is imperative to have your website and social accounts working together to bump up the visibility of your school as a whole. Then by pushing out information from this central location, you are sure to capture everyone, using the method they are most comfortable with.
In addition, if you’re posting from Facebook to Twitter (or Twitter to Facebook) this requires your Twitter followers to visit Facebook to read your posts! Or your Facebook followers to sign up for twitter to view your tweets! Remember, you can’t view much of Twitter without an account. Not a desirable requirement at all. Your information should be accessible and easy to find. The best way is to post to your website and auto share from there. We have an integrated plugin that makes this very easy–it will automatically post your news to any of your social networks when you post to your site–and can be turned off or on for each individual post. No more auto posting everything….you have complete control.
Social media platforms are constantly evolving their algorithms and interfaces. Content creators and marketers need to be proactive and stay updated with the latest information.
Though a small element of the entire user experience, image sizes matter a lot on social media. The wrong image dimensions can result in ill-fitting or cropped content. Worse still, the target platform might reject your carefully-edited images if they’re not optimized for size.
Below is a Twitter image size cheat sheet with updated information. The guide covers all of the following and you can jump straight to the section you find relevant:
Best Image Sizes for Social Media
Twitter cards are tweets that have a title, description and a thumbnail image, which is designed to give viewers a preview of the content before clicking through to the featured website. When social media followers share this content on Twitter, the image, video or other media will appear directly in the interface, creating a more visual brand experience. In fact, Twitter cards are more likely to gain increased exposure through retweets.
The best news is that your school websites already have this functionality available! If you have your school website tied to your Twitter account, Twitter Cards are also enabled by default.
The obvious choice of social network is the one who your visitors are. So, who are they?
The more detailed the better.
Fun Facts:
Demographics:
Throughout this post, you’ll find the size and dimensions of every type of social media graphic you’ll be creating. But here’s the TL;DR cheat sheet:
YouTube
On various social networks, you can create a smorgasbord of posts. Here’s a list of visuals you can make and publish on different networks:
Profile image
The profile image displays at 170 x 170 pixels. You need to upload a square, but the final image will appear as a circle. (This seems to be the case across the board for each social media channel in this post.) You can upload images up to 2048 x 2048 pixels for higher quality. It’s best to use a headshot or logo here.
Cover Photo
The cover photo measures 820 x 312 pixels. You can also upload videos.
In-feed images
These are images that appear in the Facebook newsfeed. The recommended size is 1,200 x 628 pixels. But Facebook will resize them in the feed to have a maximum width of 680 pixels, and the height adjusts according to the width. Users can view a larger version if they click on the image. Uploading a larger image improves the sharpness, even though Facebook reduces the size.
Stories
Facebook Stories are a popular format. They measure 1,080 x 1,920 pixels and take up the entire mobile screen. Stories are popular for two reasons. One is that they appear at the top of the feed and people see them as soon as they log in. While the other is that they only last 24 hours and people want to get a peek before they disappear forever. The FOMO is real.
Link thumbnails
The ideal thumbnail size is 1200 x 628 pixels. The minimum size is 560 x 292 pixels, and the aspect ratio is 1.91:1. Using images of this size will ensure that the large thumbnail appears when you share a link.
You can only publish images and videos on Instagram. This is why it’s imperative to create the best images. But you won’t magically get powerful results just because you publish beautiful images. Your success hinges on how well your images educate or entertain the Instagram crowd.
Profile picture
It displays at 180 x 180 pixels. You will need to upload a square image, but it shows as a circle.
In-feed posts
Ideal sizes vary for square, portrait, and landscape images.
Square image size: 1,080 x 1,080 pixels.
Portrait image size: 1,080 x 1,350 pixels.
Landscape image size: 1,080 x 566 pixels
The dimensions you choose should depend on the image you are making. I find that square images work best most of the time because they’re perfectly sized for Instagram’s grid gallery format. However, this study from Dash Hudson found that portrait images may actually do best. Square images came in second and landscape images came in last. The differences aren’t monumental, but they can add up over time.
Stories
Instagram stories are 1,080 x 1,920 pixels, and they take up the whole screen on mobile. Just like Facebook stories, they vanish in 24 hours.
You can also overlay interactive stickers, such as questions, polls, countdown timers, and quizzes.
Highlights:
Instagram stories last for just 24 hours. After that, they’ll appear in your archive. You can restore them any time and place them under your bio as highlights with a cover photo.
Cover photos are circle-shaped, but you need to upload a square image. It should be 180 x 180 pixels, just like the profile image. But you can upload a larger image for better quality. Because the bio is limited to very few characters, you can use highlights to inform people about your business.
As you might guess by now, images get more retweets. Many of the most retweeted tweets are images.
Profile picture
A circle profile picture is displayed, but you should upload a square image. The recommended dimensions are 400 x 400 pixels.
Header image
The header image appears at the top of the account. It has to be 1,500 x 500 pixels.
Tweet images
The ideal image size is 1,200 x 675 pixels.
Link thumbnail
The ideal Twitter link thumbnail size is 800 x 418 pixels. But the image you use for the Facebook link thumbnail will work because the aspect ratio is the same (1.91:1).
Pinterest is probably the most image-centric social network. You can publish videos here too, but images make up the significant chunk of content.
Profile picture
This should be a minimum of 180 x 180 pixels. The recommended size for uploading is 600 x 600 pixels. Here too, it’ll unfold as a circle even though you must upload a square.
Cover image
You can see the cover image at the top of the profile. The ideal image size is 1,600 x 900 pixels, but you can also use video. If you don’t want to use an image or video, you can display your latest pins.
It’s a nice way to give potential followers a sneak peek of what they’ll see if they follow you. Make sure you pin top-quality images if you plan to display your latest pins.
Board covers:
You can also add covers to your boards. These should be 200 x 200 pixels.
Pin image size
The ideal Pinterest image size is 1000 x 1500 pixels, and the aspect ratio is 2:3. Portrait images do well on this site.
Portrait images do better on Pinterest because of the way the feed appears. On most social networks, posts appear one below the other. On Pinterest, they appear next to each other in columns. When you create a taller image, you have a longer column that overshadows smaller images, occupies more space, and attracts more attention.
Pinterest story pin size
You can publish story pins on Pinterest, but they’re different from stories on other networks. These pins appear in the feed, and show up as carousels with a minimum of 2 slides and a maximum of 5 slides. Story pins have to be 900 x 1600 pixels (9:16 aspect ratio).
Profile picture
LinkedIn recommends you upload a 400 x 400 pixel image.
Background photo
The LinkedIn background photo or cover image should be 1,584 x 396 pixels. The aspect ratio is 4:1.
Post images
Post images should be 1,104 x 736 pixels. This is for both pages and profiles.
Link thumbnail
Link thumbnails must be 1,200 x 628 pixels. It’s the same as Facebook. The recommended aspect ratio is also the same (1.91:1).
Most people think YouTube is a video social network or search engine where you can only publish videos. But there are several types of images you can post here. These include:
Profile picture
For YouTube, the final image ends up being 250 x 250 pixels in size, but you must upload an 800 x 800 pixel image. It gets cropped to a circle.
Channel art
The channel art is similar to a cover image on other networks as it soars over the channel. It should be 2,560 x 1,440 pixels.
Thumbnails
The thumbnail is 1,280 x 720 pixels. It appears on videos when people search for them or when YouTube recommends them in the feed. You also see thumbnails when you visit a channel.
End cards
End cards appear in the last five to twenty seconds of a video. You can place elements such as recommended videos, playlists, a subscribe button, and a link. You don’t need to place a background image, but adding one that’s 1,280 x 720 pixels helps reduce distractions.
Watermark
After the video starts, you can set the time at which your watermark appears. You might have seen a watermark on the bottom right corner of videos. When you scroll over this image, a subscribe button appears. Most people use their company’s logo or a call to action. Keep in mind that your image has to be 150 x 150 pixels at least.
Posts
You can post pictures in your channel’s community. YouTube suggests an aspect ratio of 1:1 since images appear as squares in the feed. I recommend a minimum size of 500 x 500 pixels.
Stories
Like on other networks, stories are 1,080 x 1,920 pixels and take up the whole mobile screen.
PDFs have allowed people to collaborate and share ideas across devices since 1991. But we have also come to use them in cases where they are not the best choice for displaying content on the web. Rather than creating a page with content, someone uploads a PDF.
This poses a whole slew of issues. From ADA-compliancy to mobile-friendliness, your PDFs could be hurting your school’s website.
Here are some major reasons why you should start thinking about how you are using PDFs on your site.
If you have a document with just text or text mixed with decorative pictures, the pdf will automatically be *mostly* compliant. However, there are some bad habits still lingering about:
In the cases above, the resulting PDF is 0% ADA compliant, because all the scannable text has been removed from the document. Also you are causing yourself a lot more work in the long run. All of the items listed can be done much more easily on a web page.
While at first glance, it may appear easier to upload a PDF — due to limited staff or training — this process is creating a lot more work for you.
When you create a PDF first, and then upload it to your website, you’re essentially duplicating your efforts. In most cases, you already have website tools (and in some cases, content) available to you on your website to make the exact same thing.
Rather than creating a PDF version first, and then distributing it online, think about how you can use your website tools to display this information dynamically. Therefore, if there is a change, you don’t need to edit the original document, re-export, and re-upload.
For example, many schools use Modern Events Calendar to share the school calendars. So, if there is a change, you can edit it in one location online, and publish it everywhere — rather than spending time editing a document elsewhere and re-distributing.
This same theory and strategy can be applied to virtually any PDF you wish to post on your website.
While a PDF will, of course, scale to fit the size of your device — it’s not actually responsive. This means users need to pinch and zoom around to find the information that they are looking for. In addition, unless you’ve added dynamic links to the document, viewers cannot click to call or visit links you’ve provided in the PDF itself, thus, hindering that seamless online experience we all strive for.
While this may not apply to every PDF you wish to create, in many cases, PDFs are intended to promote an event. When you upload a PDF, or use a PDF as your primary source of content, you instead make it hard for your website visitors to act immediately on something — and also adding extra clicks to view small snippets of information.
Of course, PDFs can be of value. We use use them to post school board minutes and student handbooks, etc.
Our wordpress installations come with many custom features, one of which includes the ability to replace files with newer ones.
Because people create bookmarks and hotlinks and all sorts of page links directly to your files, it is ALWAYS best to have a URL for each important file that will never change.
Adding a Permanent File
To accomplish this, the first time you post a document, make sure you use a generic name. For instance, a Dress Code document would be called “Dress-Code.pdf” or even “Dress Code.pdf”. When this is uploaded to WordPress, the spaces will automatically be taken out and it will become “Dress-Code.pdf”. Once that is in place, it will have a static URL (web address) that can be used to link from various pages or links menu, etc.
Next year when the file needs to be updated, instead of posting an all new file, and having to relink every reference to the file, just go into the “Media” area, and find your file (if there are a lot of files, use the search to find it). There is a button called “Upload a new file”. Click this, and replace the old file with the new one.
The static URL (web address) will remain the same as before, so any links to the old file do not have to be updated.
Old files do not need to be archived on the website, if you wish to keep an archive of all the past dress codes, or other documents, the proper place for this is a file share or other method. The School Website should only have the most up to date document that is applicable at that given time.
Replacing a File
Upload a document to “Media” and create a link to it from your sidebar or web page (the method for uploading and linking is in the previous tutorial).
To replace the file, go into “Media” and search for the file you wish to replace. Click edit to open the file for editing. With the file open for editing, click the “Upload a new file” button.
You will then be presented with two options:
Most times, you’ll just browse for the file, and leave the default on “Just replace the file” and click “Upload”.
However if you had named the file poorly before, and wish to update to a more generic name, you can do so by browsing for the file, then select “Replace the file, use new file name and update all links” and click “Upload”. This will replace the existing links with the new file name and relink all the references to your old file automatically!!
Validating a website is the process of ensuring that the pages on the website conform to the norms or standards defined by various organizations. Validation is important, and will ensure that your web pages are interpreted in the same way (the way you want it) by various machines, such as search engines, as well as users and visitors to your webpage.
Conforming to standards and regulations is one of the many ways you can make your website universally understood. Make sure your codes and styles validate across the board. That means they have to meet the “strict” standards set by the W3C Organizationand pass a variety of validations for CSS and XHTML.
Not all validators check for the same things. Some only check CSS, others XHTML, and others for accessibility. If you are sincere in presenting standardized pages to the public, test them with several validators. The World Wide Web Consortium sets the standards and also hosts a variety of web page validators.
In simple terms, validation ensures that your website complies with the standards accepted by most web designers. That also means that it will be accessible to more people, across more web browsers and operation systems. Having an accessible website is also regarded as good web design practice. As you can see, having a validated website has its definite plus points.
To help you validate your WordPress site, here is a quick checklist:
https://www.deque.com/accessibility-beginners-guide/
https://www.w3.org/WAI/fundamentals/accessibility-intro/
https://www.w3.org/WAI/people-use-web/
https://www.w3.org/WAI/perspective-videos/
https://forestviewacademy.co.uk/
https://www.woodstockschool.in/
ON THE INTERNET, ALL CAPS IS CONSIDERED “YELLING”.
For this reason, it is not appropriate to use all caps on your web pages, it is preferred to use h1, h2, h3, etc. depending on the size you need. You may also use it sparingly for emphasis, however typically italics and/or bold is best.
On a website, underlines are links! When text is underlined, website visitors assume it’s click-able and may try to click it! Please do not use underlines anywhere on your pages, under any circumstances. There is absolutely no reason whatsoever to underline text on a web page. Text that represents a link is automatically underlined by the browser.
There is a lot of conflicting information making the rounds on what can and can’t be done with regard to teacher websites, social media, school websites, etc. This is the first post in a series, where I will try to clear up all the misinformation!
There are many tools available to us for disseminating information to the public.
Skyward–All assignments should be here. There are calendar entries that can be configured for events (related to the permission level of the user–so school events would need to be done at that level not by a teacher). In addition, there is a “Facebook-like” messaging center. Skyward is the first place where information should be placed, when it comes to academics, classroom info, grading, assignments, and communication with parents and students.
School Websites–The next step up is the school website. Here is where overall information about the school is placed and all public information. ALL TEACHERS AND STAFF have access to post on the website! What this means is that teachers and staff can contribute news and events to the school website. It’s a matter of login, post, and the post goes to the webmaster for approval. If you have ever posted to Lucie Link, it is exactly the same!
The link to post can be found on this page (use the link for your school):
http://schools.stlucie.k12.fl.us/website-login-links/
Login with your network username and password.
School Messenger–Replaced ConnectED and is used to send out phone messages to parents/employees. Sending a message through this system needs to be approved by the principal.
Lucie Link–Anyone can post to Lucie Link. All posts are monitored/subject to approval. The link to post is: Lucie Link (login with your network username/password)
District Website–Generally content is supplied by district staff. Teachers and schools have Lucie Link, on the home page, right at the top…and it doesn’t really get any better than that! However if you do have content that you feel is valuable at a district level, please contact the district webmaster (that’s me!) at webmaster@stlucieschools.org
Photos and video – You cannot place photos or video of students on your site, period. There is no disclaimer that you can make or permission that you can employ that allows you to do this. Parents check a box on their application that constitutes a legal photo release for that student and the rights are granted for use on the district website or school websites. In addition to the release there are guidelines which should be followed. These can be found at http://www.stlucie.k12.fl.us/pdf/website-guidelines.pdf
Calendars – We have lots of calendars. Calendars in Skyward, calendars on the district website, calendars on the school website. If you have calendar events, please do not hide them on your teacher web page, more people need to know 🙂 Use Skyward for class assignment or project due dates. Use the school website for special things you’re doing. And if you link to the District Calendar, please link to the copy on the district website, do not download your own copy to link to. The link for the district calendar is *always* https://www.stlucie.k12.fl.us/pdf/School-Calendar.pdf so if you set your link to that, it will always be the current calendar.
Utilizing the drafts feature should prevent any need for creating place holder pages. Anything saved as a draft will not show up to the public. The purpose is to allow a page to be worked on and saved without actually posting it, or to allow the approval of content before the page goes live.
There is an extremely important reason why you don’t want to publish blank pages…the website software is integrated with Google search which means your site is going to be far more visible on the internet than previously. You do not want to be indexing blank pages or pages with duplicate information or you can be penalized by Google and your site pushed down in relative searches.
Having up to date, relevant content is extremely important, as well as clear and concise copy that is written for the web.
The other reason for not creating temporary pages is because of “permalinks”. WordPress creates links based on the title of your page or post. If you create a “Contact Us” page, it will name the page
http://schools.stlucie.k12.fl.us/yourschool/contact-us
If you later decide you don’t like that page and create another one, it will be named
http://schools.stlucie.k12.fl.us/yourschool/contact-us-2
This can be avoided by editing the original page rather than deleting and creating a new one. Versions of pages are saved as well, and this gets lost when the page is deleted.
The best way to create an app on Facebook is to make samanthadotnet an administrator in “Page Roles” under your page settings. Then Request an App
If you would like to try it on your own:
To create an app requires becoming a developer on Facebook. This operation is tied your personal account, and requires text message validation through your cell phone, which will then be associated with your personal Facebook account. Once you are a developer, you can create Facebook apps for any pages that you manage.
If you wish to become a developer, then please follow the steps below.
Login to your Facebook account.
Go to the Developers page: https://developers.facebook.com/
1. Click green button “Register as a Developer”:
2. Accept the policy, click “Continue”:
3. Confirm your phone number:
5. You are now a Facebook Developer. Now you can create an app (see instructions following.)
FAQ: Question: Why I can’t create an app on developers.facebook.com/apps ? When I am trying to enter that page it redirects me back to my account!
Answer: Facebook “Business” or “Advertising” accounts can’t manage apps. Only real user accounts are able to create and manage apps. Please login to Facebook as a personal account to be able to create app.
3. Click “Apps -> Create a New App” menu item.
The new wizard is actually much more complicated to setup to what we need, so click “Advanced Setup”.
Fill “App Name”, leave “App Namespace” empty, select any category. agree to policies and click “Create App”, fill captcha, click “Submit”.
Important: Please use your own information, don’t literally re-type “NextScripts Blog”, “NextScripts.com” and other sample info.
– Notice App ID and App Secret (Click “Show”, enter your password) on this page.
4. Click “Settings” on the left, fill “Contact email” field, then click “Add Platform”.
5. Select “Website” in the list.
Enter your website URL to the “Site URL” field. Enter your domain to the App Domains. Domain should be the same domain from URL that you have entered to the “Site URL”.
Important!: You must enter the URL and domain that you see in your WordPress Admin Panel. For example your visitors come to your blog at http://www.yourdomain.com, but you manage your blog from http://www.yourdomain.com/wp-admin/ – you must enter http://www.yourdomain.com to the URL Field and www.yourdomain.com as the domain. Also please note that yourdomain.com and www.yourdomain.com are two different domains.
Important!!! Again, Please use your own information, don’t literally re-type the information below.
6. All Facebook apps are “Sandboxed” by default. All posts will be visible only to to Admins, Developers and Testers. You need to take an app “Live” if/when you would like your posts to be seen by everybody.
Click “Status & Review” on the lest. Change “Do you want to make this app and all its live features available to the general public?” switch from “No” to “Yes”.
Just to avoid any confusion. You don’t need to submit your app for review and approval.
1. Login to your WordPress Admin Panel, Go to the Settings->Social Networks AutoPoster Options.
2. Click green “Add new account” button, select “Facebook” from the list.
3. Fill “Your Facebook URL” with your Community page or from step 6 above or your personal Facebook URL or your Facebook Group URL or your Facebook Business Page URL.
4. Fill “App ID” and “App Secret” from step 3 above.
1. Click “Update Settings”. Notice new link “Authorize Your Facebook Account”.
2. Click “Authorize Your Facebook Account” and follow the authorization wizard. Facebook will ask you series of questions. If you get any errors at this step, please make sure that domain for your WordPress site is entered to your App as “App Domain”.
Important #1: If Facebook tell you that you need to switch to your main account, you will need to close the wizard, go to facebook.com, switch account, and then start authorization from the beginning.
Important #2: Facebook changed some rules regarding the apps. This means that the Facebook App, Facebook profile or page and the user who authorizes the app MUST belong to the same Facebook account. So please make sure you are logged to Facebook as the same user who created the app.
Important #3: When Facebook Authorization Wizard asks you for the access privileges to your profile/pages, do not uncheck anything and don’t click “Skip”.
Facebook don’t have the ability to request permission to just one page. It’s either all of them or none. If you click “Skip” it means you forbid Facebook from posting to any of your pages, groups or profiles. The plugin will post only to the page that you specify on the “Your Facebook URL” field.
Note (Again): Please don’t pay attention to the red message on top of the screenshot above, you don’t need to submit your app for review if you will be posting to the profile and pages you admin.
4. Your Facebook account is ready to use.
Make sure you’re logged in with the Twitter account that you’re creating the app for.
Navigate to dev.twitter.com.
If you are new to the Developers site you won’t see any applications registered. Either way, it’s time to create our first application. To do this, click on the “Create an app” button.
Enter the application name, description, website address, term & policy URL. After filling all the information, submit the form by clicking on the create button.
You will be on the App Details screen (below). To access your keys and tokens, click the link that says “Keys and tokens”:
On the Keys and Tokens tab, you will see the API Key and API Secret Key listed. Click the “Create” button to generate the access token and secret token.
Now all four API key, API Secret key, Access Token, Access Token Secret, codes have been generated.
These tokens will allow your application to read Twitter information. You’ll be able to get data of your tweets, mentions, lists and more.
Calendar View Full Calendar Yearly ViewPro Monthly View – Modern Monthly View –
https://developers.facebook.com/docs/plugins/page-plugin/ https://developers.fac
(1) Go to Media (by clicking Media on the menu) and then (2) search for the name
Social media image size cheat sheet Throughout this post, you’ll find the size a


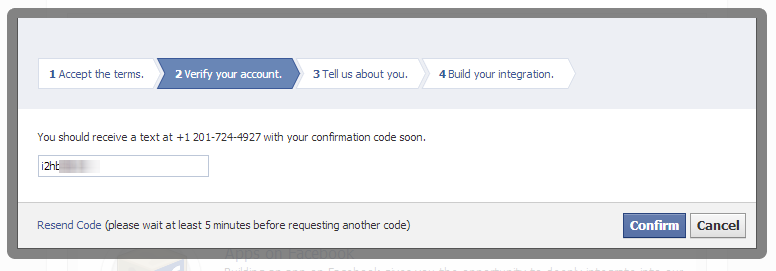
Social Media Checklist - Facebook
Make sure your facebook page is in tip-top shape for the coming school year!
Social Media Checklist - Facebook